显示屏模块-RPI使用教程
硬件连接
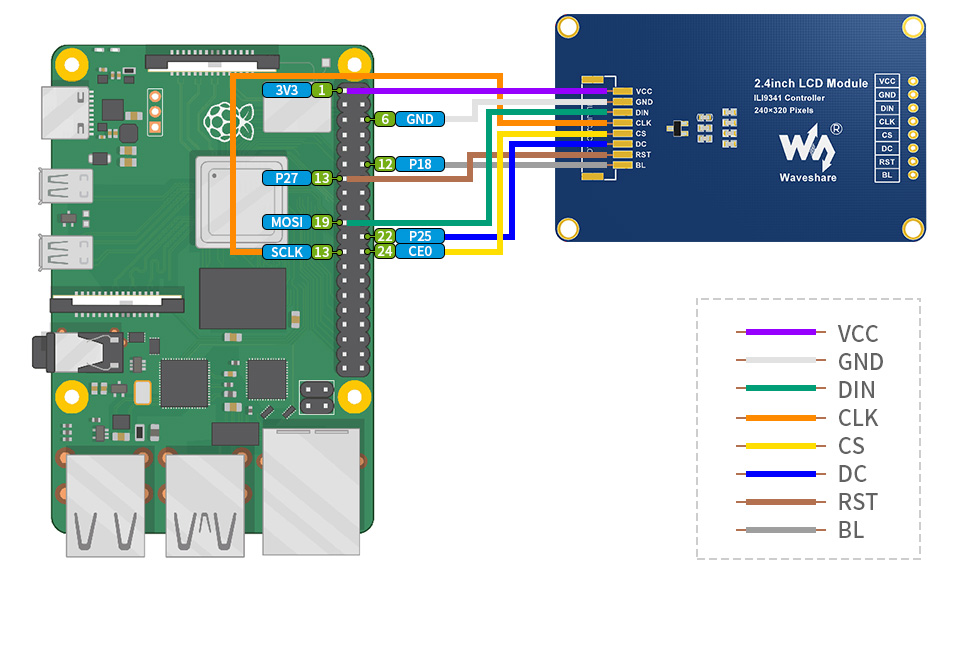
连接树莓派的时候,选择用8PIN排线连接,请参考下方的引脚对应表格
使用的是排针或者PH2.0 8PIN接口,需要对照以下表格连线
| LCD | Raspberry Pi | |
| BCM2835编码 | Board物理引脚序号 | |
| VCC | 3.3V | 3.3V |
| GND | GND | GND |
| DIN | MOSI | 19 |
| CLK | SCLK | 23 |
| CS | CE0 | 24 |
| DC | 25 | 22 |
| RST | 27 | 13 |
| BL | 18 | 12 |
以2.4inch LCD 使用的是PH2.0 8PIN接口为例,对照上述表格连接在树莓派上即可: (请按照引脚定义表格连接,图中排线颜色仅供参考,以实际颜色为准。)
开启SPI接口
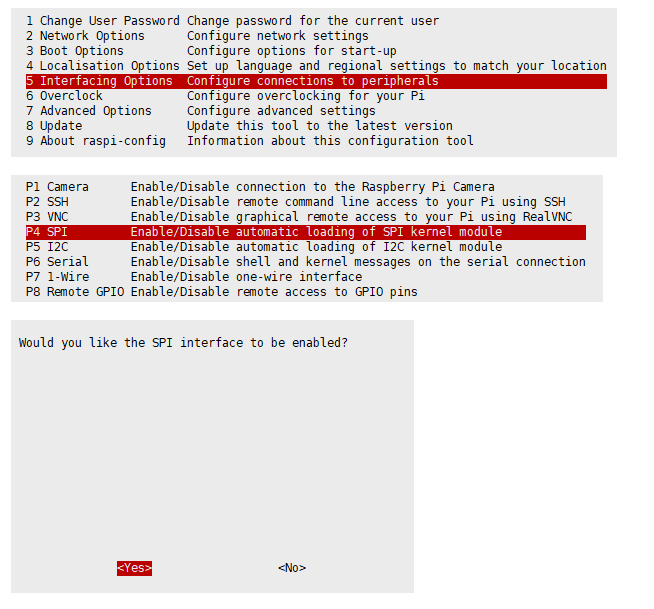
- 打开树莓派终端,输入以下指令进入配置界面
- sudo raspi-config
- 选择Interfacing Options -> SPI -> Yes 开启SPI接口
然后重启树莓派:
- sudo reboot
请确保SPI没有被其他的设备占用,你可以在/boot/config.txt中间检查
安装库
- 安装BCM2835, 打开树莓派终端,并运行以下指令
- wget http://www.airspayce.com/mikem/bcm2835/bcm2835-1.60.tar.gz
- tar zxvf bcm2835-1.60.tar.gz
- cd bcm2835-1.60/
- sudo ./configure && sudo make && sudo make check && sudo make install
- # 更多的可以参考官网:http://www.airspayce.com/mikem/bcm2835/
- 安装wiringPi
- sudo apt-get install wiringpi
- #对于树莓派2019年5月之后的系统(早于之前的可不用执行),可能需要进行升级:
- wget https://project-downloads.drogon.net/wiringpi-latest.deb
- sudo dpkg -i wiringpi-latest.deb
- gpio -v
- # 运行gpio -v会出现2.52版本,如果没有出现说明安装出错
- 安装Python函数库
- #python2
- sudo apt-get update
- sudo apt-get install python-pip
- sudo apt-get install python-pil
- sudo apt-get install python-numpy
- sudo pip install RPi.GPIO
- sudo pip install spidev
- #python3
- sudo apt-get update
- sudo apt-get install python3-pip
- sudo apt-get install python3-pil
- sudo apt-get install python3-numpy
- sudo pip3 install RPi.GPIO
- sudo pip3 install spidev
下载测试程序
打开树莓派终端,执行:
- sudo apt-get install p7zip-full
- sudo wget https://www.waveshare.net/w/upload/a/a8/LCD_Module_RPI_code.7z
- 7z x LCD_Module_RPI_code.7z -O./LCD_Module_code
- cd LCD_Module_code/RaspberryPi/
运行测试程序
以下命令请在RaspberryPi下执行,否则不在索引不到目录;
C语言
- 重新编译,编译过程可能需要几秒
- cd c
- sudo make clean
- sudo make -j 8
所有屏幕的测试程序,可以直接通过输入对应的尺寸进行调用:
- sudo ./main 屏幕尺寸
根据不同LCD,应当输入以下某一条指令:
- sudo ./main 0.96
- sudo ./main 1.14
- sudo ./main 1.3
- sudo ./main 1.54
- sudo ./main 1.8
- sudo ./main 2
- sudo ./main 2.4
python
- 进入python程序目录,并运行指令ls -al
- cd python/examples
- ls -l

可以查看到所有屏幕的测试程序,按照尺寸分类:
| 0inch96_LCD_test.py | 0.96inch LCD测试程序 |
| 1inch14_LCD_test.py | 1.14inch LCD测试程序 |
| 1inch3_LCD_test.py | 1.3inch LCD测试程序 |
| 1inch54_LCD_test.py | 1.54inchLCD测试程序 |
| 1inch8_LCD_test.py | 1.8inch LCD测试程序 |
| 2inch_LCD_test.py | 2inch LCD测试程序 |
| 2inch4_LCD_test.py | 2.4inch LCD测试程序 |
- 运行对应屏幕的程序即可,程序支持python2/3
- # python2
- sudo python 0inch96_LCD_test.py
- sudo python 1inch14_LCD_test.py
- sudo python 1inch3_LCD_test.py
- sudo python 1inch54_LCD_test.py
- sudo python 1inch8_LCD_test.py
- sudo python 2inch_LCD_test.py
- sudo python 2inch4_LCD_test.py
- # python3
- sudo python3 0inch96_LCD_test.py
- sudo python3 1inch14_LCD_test.py
- sudo python3 1inch3_LCD_test.py
- sudo python3 1inch54_LCD_test.py
- sudo python3 1inch8_LCD_test.py
- sudo python3 2inch_LCD_test.py
- sudo python3 2inch4_LCD_test.py
API详解(请选读c或python部分)
RaspberryPi系列均可以共用一套程序,因为他们都是嵌入式系统,兼容性比较强。
程序分为底层硬件接口、中间层液晶屏驱动、上层应用;
C
底层硬件接口
我们进行了底层的封装,由于硬件平台不一样,内部的实现是不一样的,如果需要了解内部实现可以去对应的目录中查看
在DEV_Config.c(.h)可以看到很多定义,在目录:RaspberryPi\c\lib\Config
- C语言使用了3种方式进行驱动:分别是BCM2835库、WiringPi库和Dev库
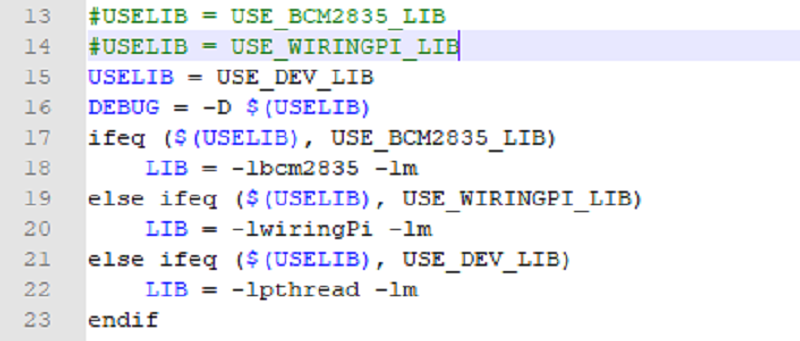
- 默认使用Dev库进行操作,如果你需要使用BCM2835或者WiringPi来驱动的话,可以打开RaspberryPi\c\Makefile,修改13-15行,如下:
- 数据类型:
- #define UBYTE uint8_t
- #define UWORD uint16_t
- #define UDOUBLE uint32_t
- 模块初始化与退出的处理:
- void DEV_Module_Init(void);
- void DEV_Module_Exit(void);
- 注意:
- 1.这里是处理使用液晶屏前与使用完之后一些GPIO的处理。
- GPIO读写:
- void DEV_Digital_Write(UWORD Pin, UBYTE Value);
- UBYTE DEV_Digital_Read(UWORD Pin);
- SPI写数据
- void DEV_SPI_WriteByte(UBYTE Value);
上层应用
对于屏幕而言,如果需要进行画图、显示中英文字符、显示图片等怎么办,这些都是上层应用做的。这有很多小伙伴有问到一些图形的处理,我们这里提供了一些基本的功能 在如下的目录中可以找到GUI,在目录:RaspberryPi\c\lib\GUI\GUI_Paint.c(.h)

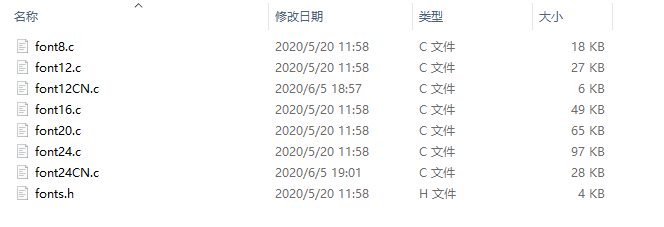
在如下目录下是GUI依赖的字符字体,在目录:RaspberryPi\c\lib\Fonts
- 新建图像属性:新建一个图像属性,这个属性包括图像缓存的名称、宽度、高度、翻转角度、颜色
- void Paint_NewImage(UBYTE *image, UWORD Width, UWORD Height, UWORD Rotate, UWORD Color)
- 参数:
- image : 图像缓存的名称,实际上是一个指向图像缓存首地址的指针;
- Width : 图像缓存的宽度;
- Height: 图像缓存的高度;
- Rotate:图像的翻转的角度
- Color :图像的初始颜色;
- 选择图像缓存:选择图像缓存,选择的目的是你可以创建多个图像属性,图像缓存可以存在多个,你可以选择你所创建的每一张图像
- void Paint_SelectImage(UBYTE *image)
- 参数:
- image: 图像缓存的名称,实际上是一个指向图像缓存首地址的指针;
- 图像旋转:设置选择好的图像的旋转角度,最好使用在Paint_SelectImage()后,可以选择旋转0、90、180、270
- void Paint_SetRotate(UWORD Rotate)
- 参数:
- Rotate: 图像选择角度,可以选择ROTATE_0、ROTATE_90、ROTATE_180、ROTATE_270分别对应0、90、180、270度
- 【说明】不同选择角度下,坐标对应起始像素点不同,这里以1.14为例,四张图,按顺序为0°, 90°, 180°, 270°。仅做为参考

- 图像镜像翻转:设置选择好的图像的镜像翻转,可以选择不镜像、关于水平镜像、关于垂直镜像、关于图像中心镜像。
- void Paint_SetMirroring(UBYTE mirror)
- 参数:
- mirror: 图像的镜像方式,可以选择MIRROR_NONE、MIRROR_HORIZONTAL、MIRROR_VERTICAL、MIRROR_ORIGIN分别对应不镜像、关于水平镜像、关于垂直镜像、关于图像中心镜像
- 设置点在缓存中显示位置和颜色:这里是GUI最核心的一个函数、处理点在缓存中显示位置和颜色;
- void Paint_SetPixel(UWORD Xpoint, UWORD Ypoint, UWORD Color)
- 参数:
- Xpoint: 点在图像缓存中X位置
- Ypoint: 点在图像缓存中Y位置
- Color : 点显示的颜色
- 图像缓存填充颜色:把图像缓存填充为某颜色,一般作为屏幕刷白的作用
- void Paint_Clear(UWORD Color)
- 参数:
- Color: 填充的颜色
- 图像缓存部分窗口填充颜色:把图像缓存的某部分窗口填充为某颜色,一般作为窗口刷白的作用,常用于时间的显示,刷白上一秒
- void Paint_ClearWindows(UWORD Xstart, UWORD Ystart, UWORD Xend, UWORD Yend, UWORD Color)
- 参数:
- Xstart: 窗口的X起点坐标
- Ystart: 窗口的Y起点坐标
- Xend: 窗口的X终点坐标
- Yend: 窗口的Y终点坐标
- Color: 填充的颜色
- 画点:在图像缓存中,在(Xpoint, Ypoint)上画点,可以选择颜色,点的大小,点的风格
- void Paint_DrawPoint(UWORD Xpoint, UWORD Ypoint, UWORD Color, DOT_PIXEL Dot_Pixel, DOT_STYLE Dot_Style)
- 参数:
- Xpoint: 点的X坐标
- Ypoint: 点的Y坐标
- Color: 填充的颜色
- Dot_Pixel: 点的大小,提供默认的8种大小点
- typedef enum {
- DOT_PIXEL_1X1 = 1, // 1 x 1
- DOT_PIXEL_2X2 , // 2 X 2
- DOT_PIXEL_3X3 , // 3 X 3
- DOT_PIXEL_4X4 , // 4 X 4
- DOT_PIXEL_5X5 , // 5 X 5
- DOT_PIXEL_6X6 , // 6 X 6
- DOT_PIXEL_7X7 , // 7 X 7
- DOT_PIXEL_8X8 , // 8 X 8
- } DOT_PIXEL;
- Dot_Style: 点的风格,大小扩充方式是以点为中心扩大还是以点为左下角往右上扩大
- typedef enum {
- DOT_FILL_AROUND = 1,
- DOT_FILL_RIGHTUP,
- } DOT_STYLE;
- 画线:在图像缓存中,从 (Xstart, Ystart) 到 (Xend, Yend) 画线,可以选择颜色,线的宽度,线的风格
- void Paint_DrawLine(UWORD Xstart, UWORD Ystart, UWORD Xend, UWORD Yend, UWORD Color, LINE_STYLE Line_Style , LINE_STYLE Line_Style)
- 参数:
- Xstart: 线的X起点坐标
- Ystart: 线的Y起点坐标
- Xend: 线的X终点坐标
- Yend: 线的Y终点坐标
- Color: 填充的颜色
- Line_width: 线的宽度,提供默认的8种宽度
- typedef enum {
- DOT_PIXEL_1X1 = 1, // 1 x 1
- DOT_PIXEL_2X2 , // 2 X 2
- DOT_PIXEL_3X3 , // 3 X 3
- DOT_PIXEL_4X4 , // 4 X 4
- DOT_PIXEL_5X5 , // 5 X 5
- DOT_PIXEL_6X6 , // 6 X 6
- DOT_PIXEL_7X7 , // 7 X 7
- DOT_PIXEL_8X8 , // 8 X 8
- } DOT_PIXEL;
- Line_Style: 线的风格,选择线是以直线连接还是以虚线的方式连接
- typedef enum {
- LINE_STYLE_SOLID = 0,
- LINE_STYLE_DOTTED,
- } LINE_STYLE;
- 画矩形:在图像缓存中,从 (Xstart, Ystart) 到 (Xend, Yend) 画一个矩形,可以选择颜色,线的宽度,是否填充矩形内部
- void Paint_DrawRectangle(UWORD Xstart, UWORD Ystart, UWORD Xend, UWORD Yend, UWORD Color, DOT_PIXEL Line_width, DRAW_FILL Draw_Fill)
- 参数:
- Xstart: 矩形的X起点坐标
- Ystart: 矩形的Y起点坐标
- Xend: 矩形的X终点坐标
- Yend: 矩形的Y终点坐标
- Color: 填充的颜色
- Line_width: 矩形四边的宽度,提供默认的8种宽度
- typedef enum {
- DOT_PIXEL_1X1 = 1, // 1 x 1
- DOT_PIXEL_2X2 , // 2 X 2
- DOT_PIXEL_3X3 , // 3 X 3
- DOT_PIXEL_4X4 , // 4 X 4
- DOT_PIXEL_5X5 , // 5 X 5
- DOT_PIXEL_6X6 , // 6 X 6
- DOT_PIXEL_7X7 , // 7 X 7
- DOT_PIXEL_8X8 , // 8 X 8
- } DOT_PIXEL;
- Draw_Fill: 填充,是否填充矩形的内部
- typedef enum {
- DRAW_FILL_EMPTY = 0,
- DRAW_FILL_FULL,
- } DRAW_FILL;
- 画圆:在图像缓存中,以 (X_Center Y_Center) 为圆心,画一个半径为Radius的圆,可以选择颜色,线的宽度,是否填充圆内部
- void Paint_DrawCircle(UWORD X_Center, UWORD Y_Center, UWORD Radius, UWORD Color, DOT_PIXEL Line_width, DRAW_FILL Draw_Fill)
- 参数:
- X_Center: 圆心的X坐标
- Y_Center: 圆心的Y坐标
- Radius:圆的半径
- Color: 填充的颜色
- Line_width: 圆弧的宽度,提供默认的8种宽度
- typedef enum {
- DOT_PIXEL_1X1 = 1, // 1 x 1
- DOT_PIXEL_2X2 , // 2 X 2
- DOT_PIXEL_3X3 , // 3 X 3
- DOT_PIXEL_4X4 , // 4 X 4
- DOT_PIXEL_5X5 , // 5 X 5
- DOT_PIXEL_6X6 , // 6 X 6
- DOT_PIXEL_7X7 , // 7 X 7
- DOT_PIXEL_8X8 , // 8 X 8
- } DOT_PIXEL;
- Draw_Fill: 填充,是否填充圆的内部
- typedef enum {
- DRAW_FILL_EMPTY = 0,
- DRAW_FILL_FULL,
- } DRAW_FILL;
- 写Ascii字符:在图像缓存中,在 (Xstart Ystart) 为左顶点,写一个Ascii字符,可以选择Ascii码可视字符字库、字体前景色、字体背景色
- void Paint_DrawChar(UWORD Xstart, UWORD Ystart, const char Ascii_Char, sFONT* Font, UWORD Color_Foreground, UWORD Color_Background)
- 参数:
- Xstart: 字符的左顶点X坐标
- Ystart: 字体的左顶点Y坐标
- Ascii_Char:Ascii字符
- Font: Ascii码可视字符字库,在Fonts文件夹中提供了以下字体:
- font8:5*8的字体
- font12:7*12的字体
- font16:11*16的字体
- font20:14*20的字体
- font24:17*24的字体
- Color_Foreground: 字体颜色
- Color_Background: 背景颜色
- 写英文字符串:在图像缓存中,在 (Xstart Ystart) 为左顶点,写一串英文字符,可以选择Ascii码可视字符字库、字体前景色、字体背景色
- void Paint_DrawString_EN(UWORD Xstart, UWORD Ystart, const char * pString, sFONT* Font, UWORD Color_Foreground, UWORD Color_Background)
- 参数:
- Xstart: 字符的左顶点X坐标
- Ystart: 字体的左顶点Y坐标
- pString:字符串,字符串是一个指针
- Font: Ascii码可视字符字库,在Fonts文件夹中提供了以下字体:
- font8:5*8的字体
- font12:7*12的字体
- font16:11*16的字体
- font20:14*20的字体
- font24:17*24的字体
- Color_Foreground: 字体颜色
- Color_Background: 背景颜色
- 写中文字符串:在图像缓存中,在 (Xstart Ystart) 为左顶点,写一串中文字符,可以选择GB2312编码字符字库、字体前景色、字体背景色;
- void Paint_DrawString_CN(UWORD Xstart, UWORD Ystart, const char * pString, cFONT* font, UWORD Color_Foreground, UWORD Color_Background)
- 参数:
- Xstart: 字符的左顶点X坐标
- Ystart: 字体的左顶点Y坐标
- pString:字符串,字符串是一个指针
- Font: GB2312编码字符字库,在Fonts文件夹中提供了以下字体:
- font12CN:ascii字符字体11*21,中文字体16*21
- font24CN:ascii字符字体24*41,中文字体32*41
- Color_Foreground: 字体颜色
- Color_Background: 背景颜色
- 写数字:在图像缓存中,在 (Xstart Ystart) 为左顶点,写一串数字,可以选择Ascii码可视字符字库、字体前景色、字体背景色
- void Paint_DrawNum(UWORD Xpoint, UWORD Ypoint, int32_t Nummber, sFONT* Font, UWORD Color_Foreground, UWORD Color_Background)
- 参数:
- Xstart: 字符的左顶点X坐标
- Ystart: 字体的左顶点Y坐标
- Nummber:显示的数字,这里使用的是32位长的int型保存,可以最大显示到2147483647
- Font: Ascii码可视字符字库,在Fonts文件夹中提供了以下字体:
- font8:5*8的字体
- font12:7*12的字体
- font16:11*16的字体
- font20:14*20的字体
- font24:17*24的字体
- Color_Foreground: 字体颜色
- Color_Background: 背景颜色
- 写带小数的数字:在图像缓存中,在 (Xstart Ystart) 为左顶点,写一串数字可以带小数的数字,可以选择Ascii码可视字符字库、字体前景色、字体背景色
- void Paint_DrawFloatNum(UWORD Xpoint, UWORD Ypoint, double Nummber, UBYTE Decimal_Point, sFONT* Font, UWORD Color_Foreground, UWORD Color_Background);
- 参数:
- Xstart: 字符的左顶点X坐标
- Ystart: 字体的左顶点Y坐标
- Nummber:显示的数字,这里使用的是double型保存,足够普通需求
- Decimal_Point:显示小数点后几位数字
- Font: Ascii码可视字符字库,在Fonts文件夹中提供了以下字体:
- font8:5*8的字体
- font12:7*12的字体
- font16:11*16的字体
- font20:14*20的字体
- font24:17*24的字体
- Color_Foreground: 字体颜色
- Color_Background: 背景颜色
- 显示时间:在图像缓存中,在 (Xstart Ystart) 为左顶点,显示一段时间,可以选择Ascii码可视字符字库、字体前景色、字体背景色;
- void Paint_DrawTime(UWORD Xstart, UWORD Ystart, PAINT_TIME *pTime, sFONT* Font, UWORD Color_Background, UWORD Color_Foreground)
- 参数:
- Xstart: 字符的左顶点X坐标
- Ystart: 字体的左顶点Y坐标
- pTime:显示的时间,这里定义好了一个时间的结构体,只要把时分秒各位数传给参数;
- Font: Ascii码可视字符字库,在Fonts文件夹中提供了以下字体:
- font8:5*8的字体
- font12:7*12的字体
- font16:11*16的字体
- font20:14*20的字体
- font24:17*24的字体
- Color_Foreground: 字体颜色
- Color_Background: 背景颜色
- 读取本地的bmp图片并写到缓存中
对于Raspberry Pi这些Linux操作系统的,可以读写图片
对于Raspberry Pi,在目录:RaspberryPi\c\lib\GUI\GUI_BMPfile.c(.h)
- UBYTE GUI_ReadBmp(const char *path, UWORD Xstart, UWORD Ystart)
- 参数:
- path:BMP图片的相对路径
- Xstart: 图片的左顶点X坐标,一般默认传0
- Ystart: 图片的左顶点Y坐标,一般默认传0
用户测试代码
前三个章节介绍了经典的linux三层代码结构,这里稍微讲解一下用户测试代码
对于Raspberry Pi,在目录:RaspberryPi\c\examples,为全部的测试代码;

如果需要运行0.96inch LCD测试程序,你需要运行mian程序时加入 0.96作为参数
在linux命令模式下重新执行如下:
- make clean
- make
- sudo ./main 0.96
Python(适用于Raspberry Pi)
适用于python和python3
对于python而言他的调用没有C复杂
Raspberry Pi:RaspberryPi\python\lib\

lcdconfig.py
- 模块初始化与退出的处理:
- def module_init()
- def module_exit()
- 注意:
- 1.这里是处理使用液晶屏前与使用完之后一些GPIO的处理。
- 2.module_init()函数会在液晶屏的init()初始化程序自动调用,但module_exit()需要自行调用
- GPIO读写:
- def digital_write(pin, value)
- def digital_read(pin)
- SPI写数据
- def spi_writebyte(data)
xxx_LCD_test.py(xxx表示尺寸,若是0.96inch LCD,则为0inch96_LCD_test.py,依此类推)
python在如下目录:
Raspberry Pi:RaspberryPi\python\examples\

如果你的python版本是python2,且需要运行0.96inch LCD测试程序,在linux命令模式下重新执行如下:
- sudo python 0inch96_LCD_test.py
如果你的python版本是python3,且需要运行0.96inch LCD测试程序,在linux命令模式下重新执行如下:
- sudo python3 0inch96_LCD_test.py
关于旋转设置
如果在python程序中你需要设置屏幕旋转,可以通过语句im_r= image1.rotate(270)设置。
- im_r= image1.rotate(270)
- 旋转效果,以1.54为例, 按顺序分别为0°, 90°,180°, 270°

画图GUI
由于python有一个image库pil官方库链接,他十分的强大,不需要像C从逻辑层出发编写代码,可以直接引用image库进行图像处理,以下将以1.54inch LCD为例,对程序中使用了的进行简要说明
- 需要使用image库,需要安装库
- sudo apt-get install python3-pil 安装库
然后导入库
- from PIL import Image,ImageDraw,ImageFont
其中Image为基本库、ImageDraw为画图功能、ImageFont为文字
- 定义一个图像缓存,以方便在图片上进行画图、写字等功能
- image1 = Image.new("RGB", (disp.width, disp.height), "WHITE")
第一个参数定义图片的颜色深度,定义为"RGB"说明是RGB888彩色图,第二个参数是一个元组,定义好图片的宽度和高度,第三个参数是定义缓存的默认颜色,定义为“WHITE”。
- 创建一个基于image1的画图对象,所有的画图操作都在这个对象上
- draw = ImageDraw.Draw(image1)
- 画线
- draw.line([(20, 10),(70, 60)], fill = "RED",width = 1)
第一个参数为一个4个元素的元组,以(20,10)为起始点,(70,60)为终止点,画一条直线,fill="RED"表示线为红色,width=1表示线宽为1个像素。
- 画框
- draw.rectangle([(20,10),(70,60)],fill = "WHITE",outline="BLUE")
第一个参数为一个4个元素的元组,(20,10)矩形左上角坐标值,(70,60)为矩形右下角坐标值,fill= "WHITE"表示内部填充黑色,outline="BLUE"表示外边框为蓝色。
- 画圆
- draw.arc((150,15,190,55),0, 360, fill =(0,255,0))
在正方形内画一个内切圆,第一个参数为一个4个元素的元组,以(150,15)为正方形的左上角顶点,(190,55)为正方形右下角顶点,规定矩形框的水平中位线为0度角,角度顺时针变大,第二个参数表示开始角度,第三个参数标识结束角度,fill =(0,255,0)表示线为绿色
如果不是正方形,画出来的就是椭圆,这个实际上是圆弧的绘制。
除了arc可以话圆之外,还有ellipse可以画实心圆
- draw.ellipse((150,65,190,105), fill = (0,255,0))
实质是椭圆的绘制,第一个参数指定弦的圆外切矩形,fill =(0,255,0)表示内部填充颜色为绿色,如果椭圆的外切矩阵为正方形,椭圆就是圆了。
- 写字符
写字符往往需要写不同大小的字符,需要导入ImageFont模块,并实例化:
- Font1 = ImageFont.truetype("../Font/Font01.ttf",25)
- Font2 = ImageFont.truetype("../Font/Font01.ttf",35)
- Font3 = ImageFont.truetype("../Font/Font02.ttf",32)
为了有比较好的视觉体验,这里使用的是来自网络的免费字体,如果是其他的ttf结尾的字库文件也是支持的。
注:每字库包含的字符均有不同;如果某些字符不能显示,建议根据字库使用的编码集来使用
写英文字符直接使用即可,写中文,由于编码是GB2312所以需要在前面加个u:
- draw.text((5, 68), 'Hello world', fill = "BLACK",font=Font1)
- text= u"斑梨电子"
- draw.text((5, 200),text, fill = "BLUE",font=Font3)
第一个参数为一个2个元素的元组,以(5,68)为左顶点,字体为font1,点,fill为字体颜色, fill = "BLACK",所以会显示字体颜色为黑色,第二句显示斑梨电子,字体颜色为蓝色。
- 读取本地图片
- image = Image.open('../pic/LCD_1inch54.jpg')
参数为图片路径。
- 其他功能
python的image库十分强大,如果需要实现其他的更多功能,可以上官网学习http://effbot.org/imagingbook pil,官方的是英文的,如果感觉对你不友好,当然我们国内也有很多的优秀的博客都有讲解。


