- 首页
- >
- 文章中心
- >
- 树莓派教程
- >
- 树莓派显示屏
- >
- 树莓派DSI/MIPI显示屏
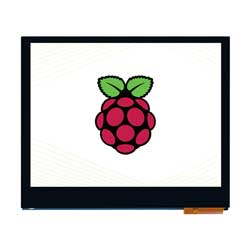
3.5inch DSI LCD (E) 使用教程
产品特点
- 3.5寸IPS显示屏,硬件分辨率为640×480
- 电容式5点触摸控制
- 钢化玻璃触摸面板(硬度 6H)
- 兼容 Pi5 / CM5 / 4B / CM4 / 3B+ / 3A+ / 3B / CM3 / CM3+ / 2B / B+ / A+
- 直接通过Raspberry Pi的DSI接口驱动LCD,刷新率可达60Hz
接口定义
| PIN | 标志 |
|---|---|
| 1 | GND |
| 2 | DSI1_DN1 |
| 3 | DSI1_DP1 |
| 4 | GND |
| 5 | DSI1_CN |
| 6 | DSI1_CP |
| 7 | GND |
| 8 | DSI1_DN0 |
| 9 | DSI1_DP0 |
| 10 | GND |
| 11 | SCL0 |
| 12 | SDA0 |
| 13 | GND |
| 14 | 3V3 |
| 15 | 3V3 |
硬件连接
搭配Pi 5/CM5/CM4/CM3+/CM3使用使用
- 使用DSI-Cable-12cm线材,将3.5inch DSI LCD (E)连接到Raspberry Pi主板的22PIN DSI1接口。
- 为了方便安装,可将 Raspberry Pi 5 固定在 3.5inch DSI LCD (E) 背面。
在组装时,请在屏幕与主板之间垫上配件包内的短铜柱,再用螺丝固定,如下图所示: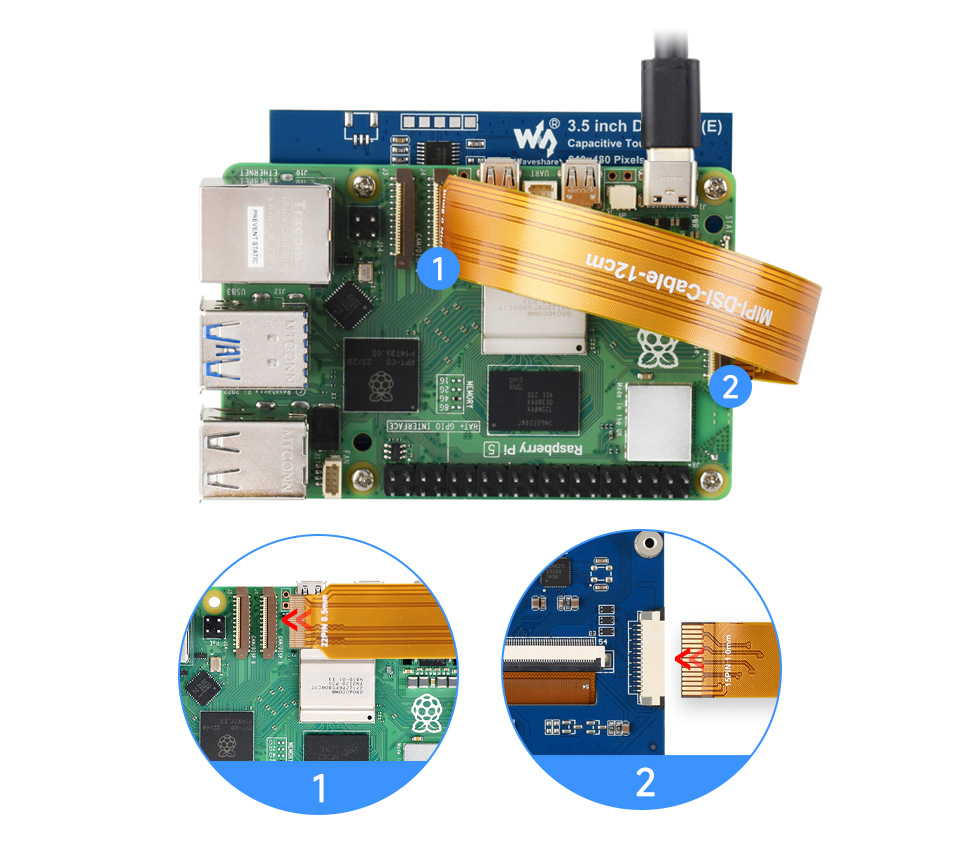
搭配Pi 4B/3B+/3A+/3B/2B/B+/A+使用
- 使用FFC线,将3.5inch DSI LCD (E)连接到Raspberry Pi主板的15PIN DSI接口。
- 为了方便使用,可以把Raspberry Pi主板通过螺丝固定的3.5inch DSI LCD (E)的背面,并组装上铜柱。
在组装时,请在屏幕与主板之间垫上配件包内的短铜柱,再用螺丝固定,如下图所示: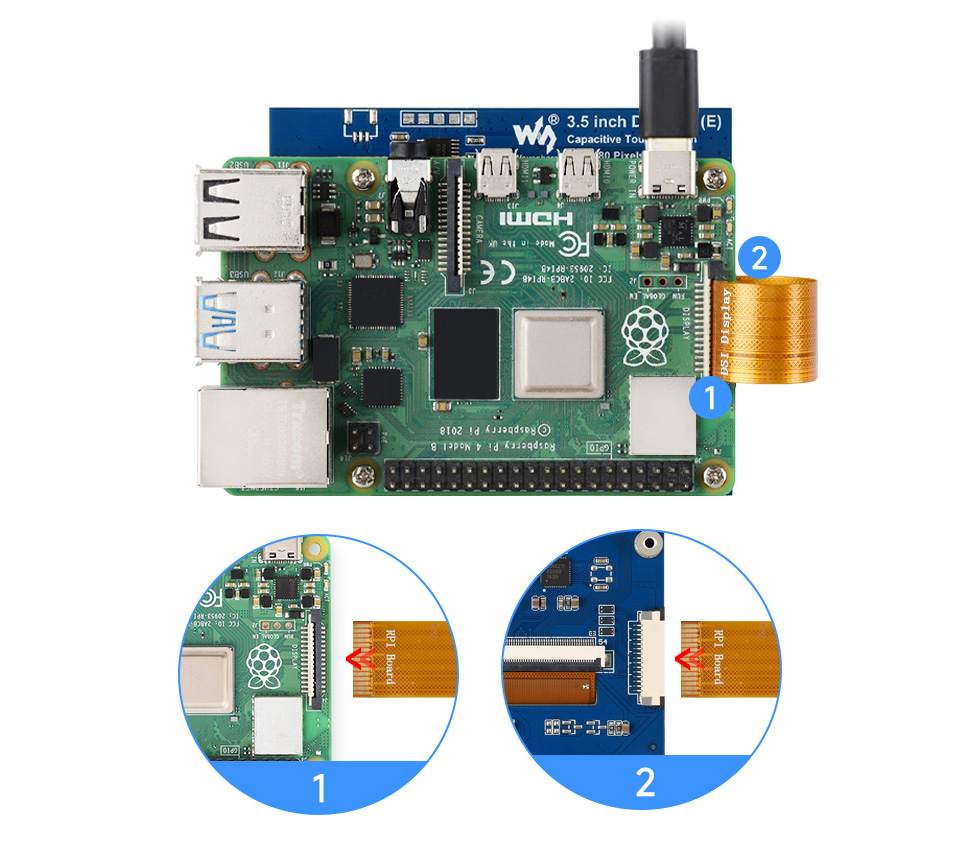
软件设置
在 Trixie / Bookworm 使用(推荐)
- 1. 将TF卡连接到PC,下载并使用Raspberry Pi Imager进行烧录对应系统镜像。
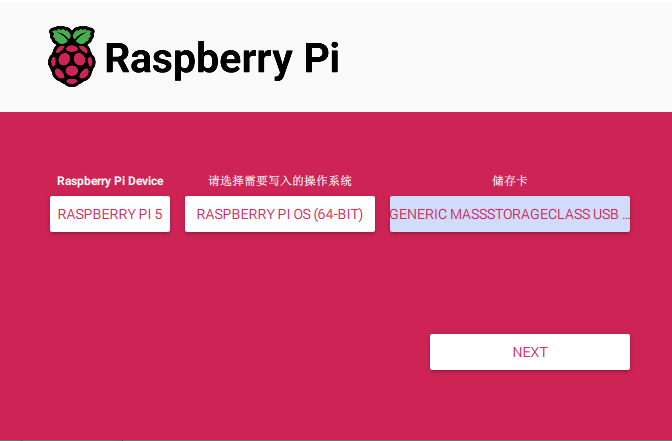
- 2. 镜像烧写完成后,打开TF卡根目录的config.txt文件,在文件末尾加入下列内容并保存:
display_auto_detect=0
disable_splash=1
display_auto_detect = 1
dtoverlay=vc4-kms-dsi-generic,hactive=640,hfp=48,hsync=32,hbp=80,vactive=480,vfp=3,vsync=4,vbp=13
dtoverlay=waveshare_35DSI- 3. 下载Waveshare_35DSI.dtbo文件并复制到overlays目录(/boot/overlays/)
- 4. 插入 TF 卡并启动树莓派,等待约 30 秒即可显示。
Trixie / Bookworm 显示旋转
GUI 界面旋转
以下步骤以Trixie系统为例:
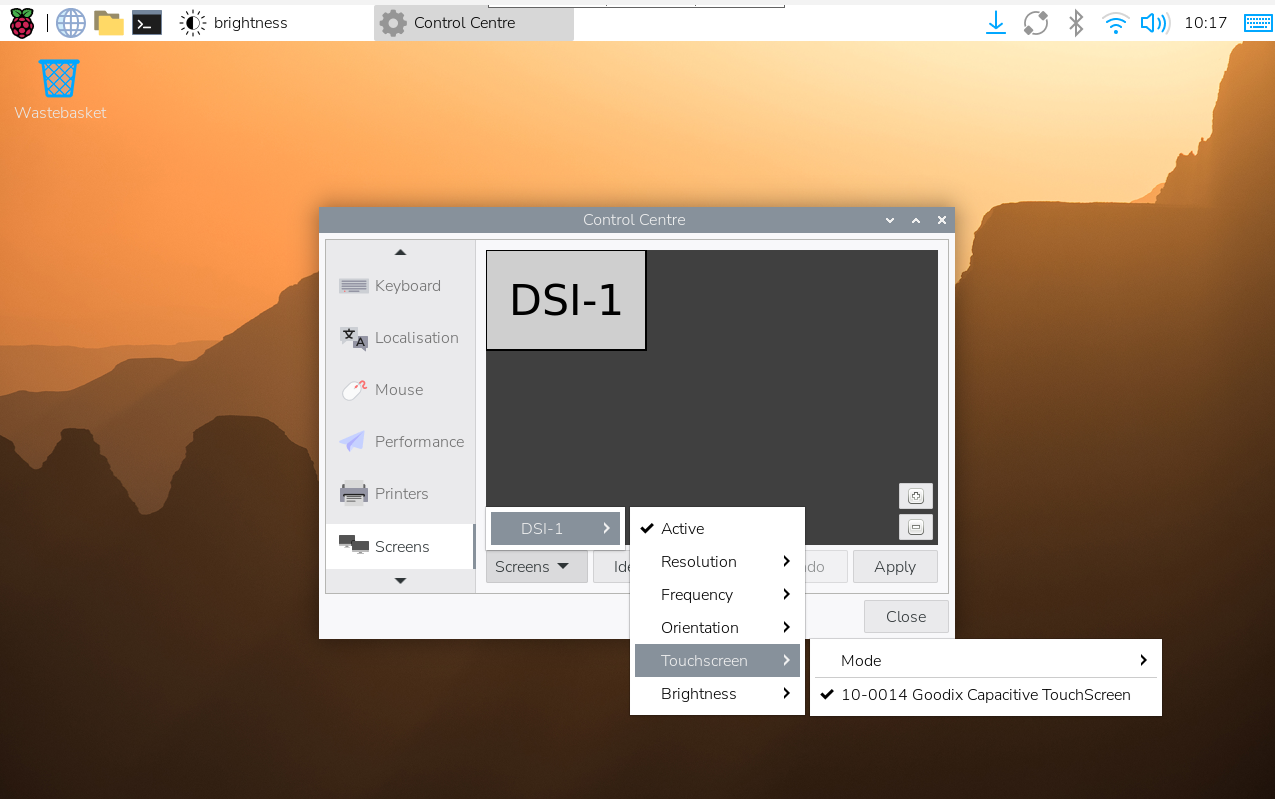
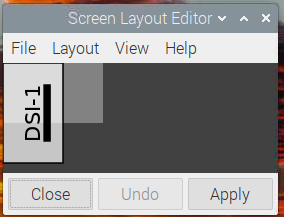
- 1.点击左上角菜单,依次进入 Preferences → Control Center,选择 Screens

- 2.进入"Screen"->"DSI-1"->"Touchscreen" ,勾选"10-0014 Goodix Capacitive TouchScreen"
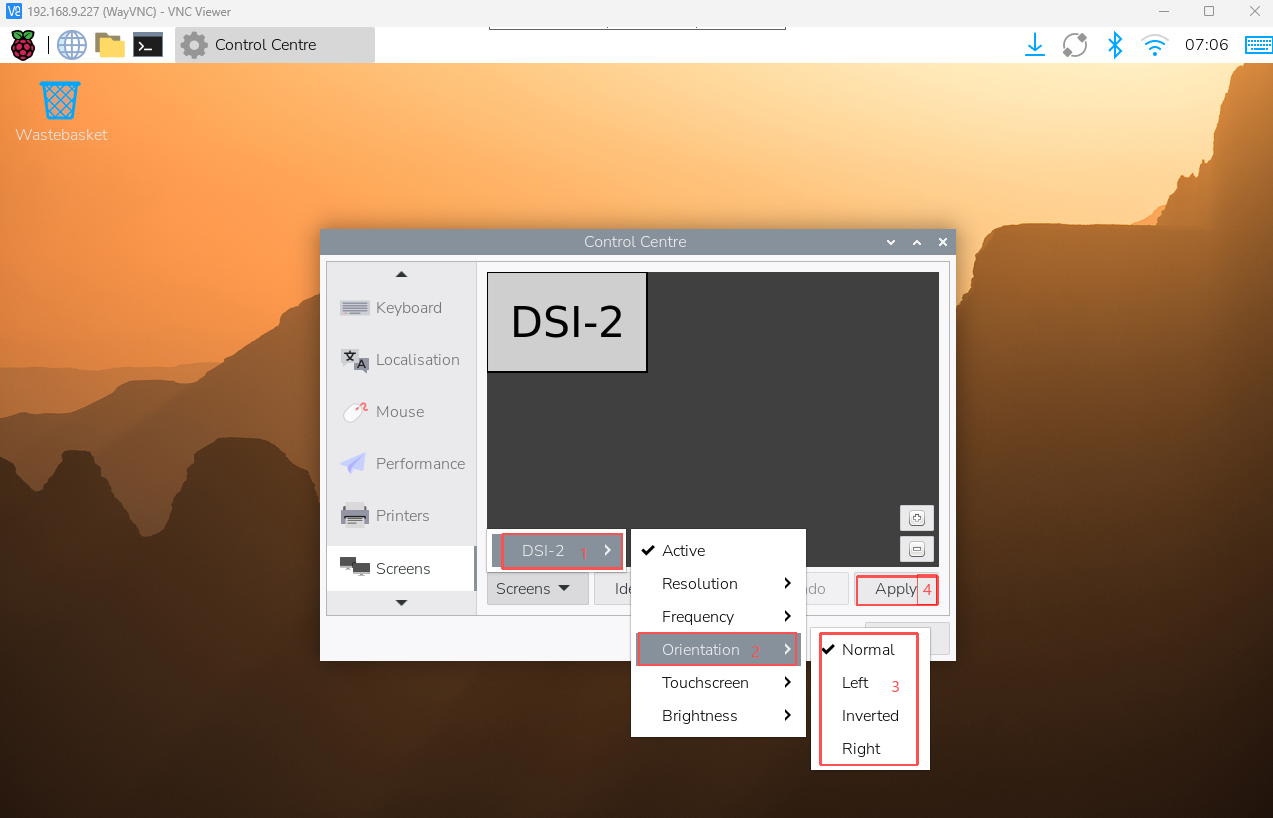
- 3:进入"Screen"->"DSI-2"->"Orientation" ,勾选您需要旋转的方向,最后点击"Apply"即可完成显示和触摸同步旋转。
- 在Bookworm系统中,该设置入口位于 Screen Configuration → Screen。
lite版本显示旋转
sudo nano /boot/firmware/cmdline.txt
#在cmdline.txt文件开头添加对应显示屏的分辨率和旋转角度指令,保存重启后生效
#例如DSI-1显示屏720x1280分辨率,显示旋转90度
video=DSI-1:720x1280e,rotate=90
#例如DSI-1显示屏720x1280分辨率,显示旋转180度
video=DSI-1:720x1280e,rotate=180
#例如DSI-1显示屏720x1280分辨率,显示旋转270度
video=DSI-1:720x1280e,rotate=270
注意:
- 1.以实际的显示屏分辨率为准。
- 2.如果是使用Pi5/CM5,以实际识别到的DSI显示器编号为准,例如"DSI-2"。
- 3.无法使用 cmdline.txt 将 DSI 显示器与 HDMI 显示器分开旋转。当您同时使用 DSI 和 HDMI 时,它们共享相同的旋转值。
在Bullseye系统上使用(需编译驱动)
烧录官方Bullseye系统
- 1. 请从 Raspberry Pi 官方下载适用于 Bullseye 的系统镜像(根据需要选择 32 位或 64 位):
- 2. 将镜像使用Win32DiskImager.exe烧写到 TF 卡中,然后插入树莓派并启动系统。
安装头文件和驱动
sudo apt-get update
sudo apt-get install unzip -y
sudo apt-get install cmake -y
sudo apt-get install raspberrypi-kernel-headers
sudo wget https://www.waveshare.net/w/upload/4/45/Waveshare_35DSI.dtbo
sudo wget https://www.waveshare.net/w/upload/8/84/Vc4-kms-dsi-generic.dtbo
sudo wget https://www.waveshare.net/w/upload/7/78/3inch5_DSI_E_Drives_Bullseye.zip
sudo cp Waveshare_35DSI.dtbo /boot/overlays/
sudo cp Vc4-kms-dsi-generic.dtbo /boot/overlays/
sudo unzip ./3inch5_DSI_E_Drives_Bullseye.zip
cd 3inch5_DSI_E_Drives_Bullseye
编辑config.txt文件
sudo nano /boot/config.txt
在 [all] 末尾加入:
display_auto_detect=0
disable_splash=1
display_auto_detect = 1
dtoverlay=vc4-kms-dsi-generic,hactive=640,hfp=48,hsync=32,hbp=80,vactive=480,vfp=3,vsync=4,vbp=13
dtoverlay=Waveshare_35DSI
先不要重启树莓派。
查看当前系统内核版本
uname -r
将会看到以下两种之一:
请根据对应内核版本的步骤操作
6.1.21-v7+
- 编译 panel-simple
cd ~/3inch5_DSI_E-RPi3_6.1.21-v7+/panel_simple-ko
sudo make
sudo xz panel-simple.ko
sudo cp panel-simple.ko.xz /lib/modules/6.1.21-v7+/kernel/drivers/gpu/drm/panel/
- 编译触摸驱动 goodix_ts
cd ~/3inch5_DSI_E-RPi3_6.1.21-v7+/goodix_gt911-ko
sudo make
sudo xz goodix_ts.ko
sudo cp goodix_ts.ko.xz /lib/modules/6.1.21-v7+/kernel/drivers/input/touchscreen/
sudo depmod -a
sudo reboot重启后屏幕即可正常显示触摸
6.1.21-v8+
- 替换 panel-simple
cd ~/3inch5_DSI_E-RPi4_6.1.21-v8+/panel_simple-ko
sudo cp panel-simple.ko.xz /lib/modules/6.1.21-v8+/kernel/drivers/gpu/drm/panel/
- 替换触摸驱动
cd ..
cd ~/3inch5_DSI_E-RPi4_6.1.21-v8+/goodix_gt911-ko
sudo cp goodix_ts.ko.xz /lib/modules/6.1.21-v8+/kernel/drivers/input/touchscreen/
sudo depmod -a
sudo reboot重启后屏幕即可正常显示触摸
Bullseye显示旋转
GUI 界面旋转
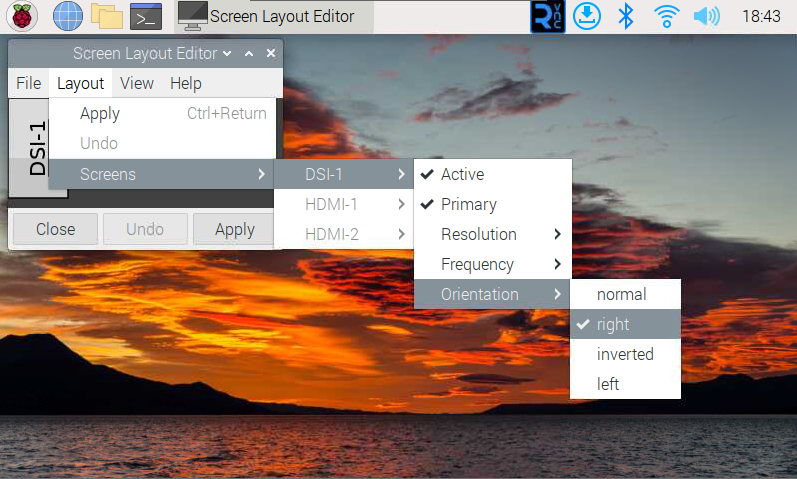
- 1.打开"Screen Configuration"应用程序;
- 2.进入"Screen"->"DSI-1"->"Orientation" ,勾选您需要旋转的方向,最后点击"Apply",即可完成显示旋转。
lite版本显示旋转
- 1.需要修改/boot/cmdline.txt文件:
sudo nano /boot/cmdline.txt
- 2.在cmdline.txt文件开头,添加对应显示旋转角度的指令:(请注意,该命令需要放在同一行上,每个命令用空格分隔。)
video=DSI-1:800x480M@60,rotate=90
通过将rotate值更改为 90、180 或 270 来更改显示旋转的角度。
- 3.保存并重新启动
sudo reboot
Bullseye 触摸旋转
部分系统显示旋转后,触摸方向不一致,需要按下文操作进行触摸旋转:
1. 安装libinput
sudo apt-get install xserver-xorg-input-libinput
- 如果你安装的是Ubuntu系统,或者是Jetson Nano。安装指令为
sudo apt install xserver-xorg-input-synaptics
2. 在/etc/X11/下创建xorg.conf.d目录 (如果该目录已存在,这直接进行第3步)
sudo mkdir /etc/X11/xorg.conf.d
3. 复制40-libinput-conf 文件到刚刚创建的目录下
sudo cp /usr/share/X11/xorg.conf.d/40-libinput.conf /etc/X11/xorg.conf.d/
4. 编辑该文件
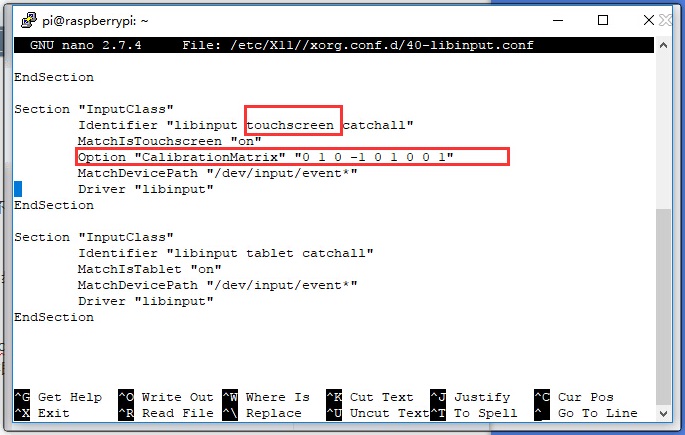
sudo nano /etc/X11/xorg.conf.d/40-libinput.conf
#找到 touchscreen的部分,在里面添加对应的旋转角度指令,然后保存即可
#90°Right触摸旋转:
Option "CalibrationMatrix" "0 1 0 -1 0 1 0 0 1"
#180° Inverted触摸旋转:
#Option "CalibrationMatrix" "-1 0 1 0 -1 1 0 0 1"
#270° Left旋转:
#Option "CalibrationMatrix" "0 -1 1 1 0 0 0 0 1"
类似下图位置:
5. 重启树莓派
sudo reboot
完成以上步骤后触摸将会进行旋转。
预安装镜像
相关资料
图纸
软件
FAQ
问题:这款屏幕亮度是多少?
180cd/m²
问题:这款屏幕的功耗是多少?
3.3V 150mA
问题:这款屏幕支持调光吗?
目前不支持。
问题:这款屏幕是不自动息屏的吗,还是必须执行指令才能息屏?
取决于系统,如果系统有休眠,那屏幕也会黑屏。
问题:如何在树莓派 Trixie / Bookworm 上完全关闭或开启屏幕?
在使用 Wayland 环境(如 Raspberry Pi OS Trixie 或 Bookworm)时,可通过 wlr-randr 命令来控制屏幕显示状态。
#关闭屏幕
wlr-randr --output DSI-2 --off
#打开屏幕
wlr-randr --output DSI-2 --on
售后
周一-周五(9:30-6:30)周六(9:30-5:30)
手机:13434470212
邮箱:services04@spotpear.cn
QQ:202004841