

- 首页
- >
- 文章中心
- >
- 幸狐/LuckFox
- >
- Luckfox-PICO
LuckFox Pico LVGL使用教程
【LVGL使用指南】
在本篇文章中,我们将详细介绍 Framebuffer(FB)设备和 LittlevGL(LVGL)图形用户界面库的基本概念。通过使用 Luckfox Pico Pro/Max 开发板和 Pico-LCD-1.3 显示屏,我们将演示如何配置 FB 设备,利用 LVGL 库创建应用程序,最后在 LCD 实现界面显示。
【快速使用】
】硬件准备
-》Luckfox Pico Pro/Max *1
-》Pico-LCD-1.3 *1
】下载压缩包
-》下载链接:LVGL.zip
-》压缩包内容:
LVGL/
├── image ------------------------------- 镜像文件
├── lvgl_demo --------------------------- 工程目录
├── demo -------------------------------- 可执行文件
└── rv1106g-luckfox-pico-pro-max.dts ---- 设备树文件
-》烧录镜像
-》运行demo
将压缩包中的 demo 拷贝至开发板,运行程序:
chmod +x demo
./demo
-》修改程序
[] 修改Makefile
将 lvgl_demo 拷贝至虚拟机,将 Makefile 中 <SDK Directory> 修改为自己的 SDK 路径,如 /home/luckfox/luckfox-pico/
CC = <SDK Directory>/toolchain/arm-rockchip830-linux-uclibcgnueabihf/bin/arm-rockchip830-linux-uclibcgnueabihf-gcc
[] 编译工程
命令行执行 make 指令编译工程
make
[] 运行程序
编译完成后会在 /build/bin 目录下生成一个可执行文件 demo ,将该文件拷贝至开发板即可直接运行
【基本概念】
Framebuffer(FB)设备
Framebuffer(FB)设备是一种用于图形显示的硬件设备,它提供了一个帧缓冲区,用于绘制图形并直接在屏幕上显示。FB设备的使用通常涉及配置显示分辨率、颜色深度等参数,以及将绘制的图形数据传输到显示设备。
LittlevGL(LVGL)
LVGL(LittlevGL)是一款轻量级、开源的嵌入式图形库,专注于提供灵活易用的图形用户界面(GUI)解决方案。通过LVGL,开发者可以实现丰富的图形界面设计,包括按钮、滑块、文本框等各种常用的GUI控件,以及动画和触摸交互等功能。作为一款开源库,LVGL 广泛应用于各种嵌入式系统,并以其轻量级的特性受到开发者的喜爱。LVGL 支持多种显示设备,其中就包括 Framebuffer,使得开发者可以在嵌入式系统上轻松创建漂亮的用户界面。
【引脚配置】
确保所有与 LCD 通讯的引脚功能正常是驱动 LCD 的基本要求。因此,我们需要在备树文件中配置引脚功能。在此之前,我们需要确定 Pico-LCD-1.3 连接到 Luckfox Pico Pro/Max 的引脚。下面我们以 Pico-LCD-1.3 的摇杆向上引脚 GP2 为例说明,它对应到 Luckfox Pico Pro/Max 上的引脚号为4号,其 GPIO 引脚名称为 GPIO1_C7_d,引脚编号为55。
【接口图】
Pico-LCD-1.3
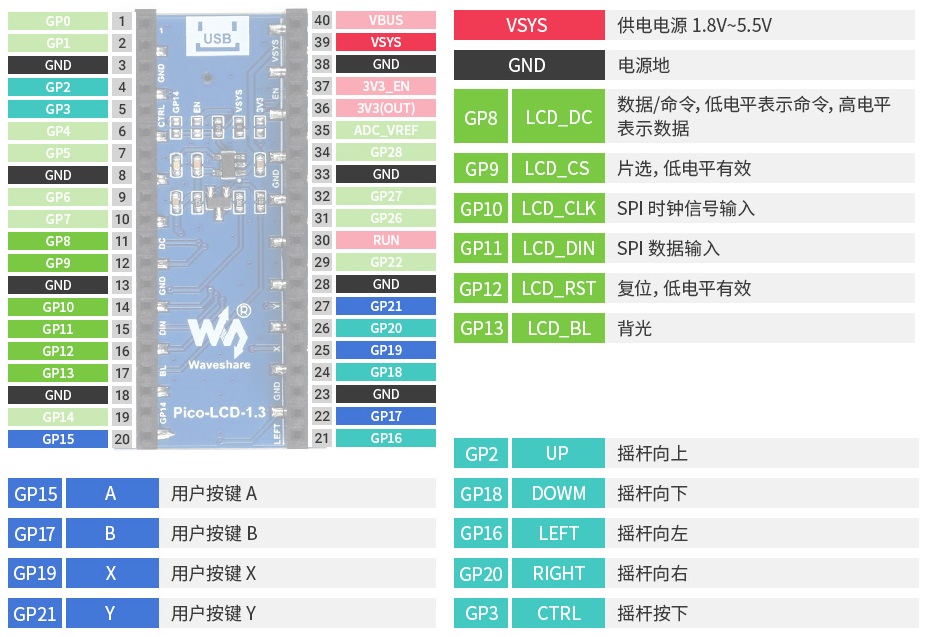
Luckfox Pico Pro/Max

【修改设备树】
可以看到 GPIO1_C7_d 的默认功能是 PWM 功能,在程序中,我们希望通过读取该引脚电平判断按键状态,所以我们需要将该引脚配置为普通IO。
[] 设备树文件的路径
<SDK目录>/sysdrv/source/kernel/arch/arm/boot/dts/rv1106g-luckfox-pico-pro-max.dts
[] 定义GPIO
定义一个 GPIO,通常需要添加两段代码。注意按键为低电平有效,需要上拉。以下是一个示例,展示如何在设备树中添加 GPIO1_C7_d 引脚的定义。
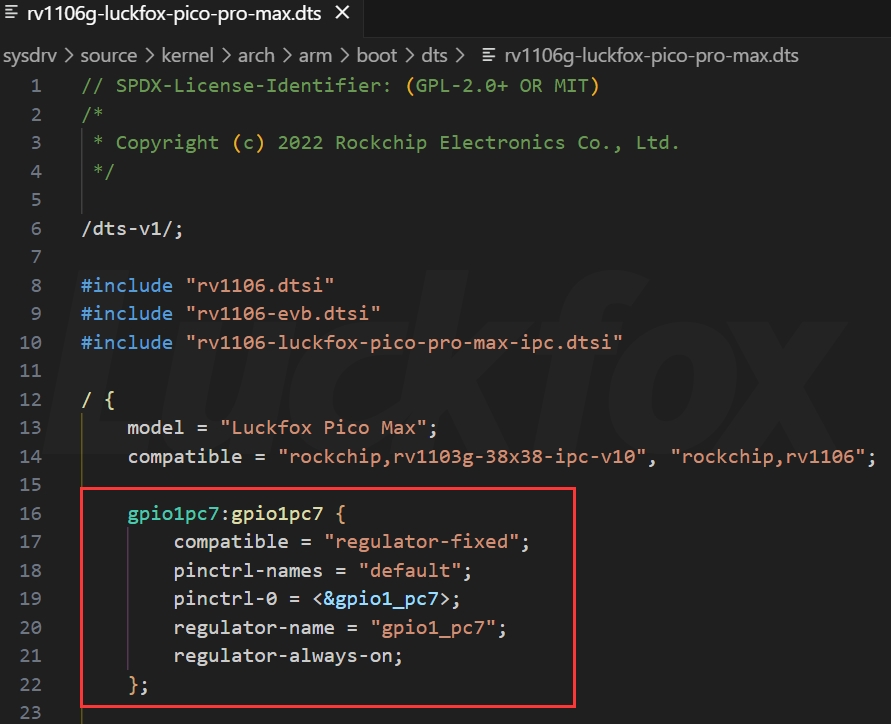
需要添加的代码片段如下:
/{
gpio1pc7:gpio1pc7 {
compatible = "regulator-fixed";
pinctrl-names = "default";
pinctrl-0 = <&gpio1_pc7>;
regulator-name = "gpio1_pc7";
regulator-always-on;
};
};
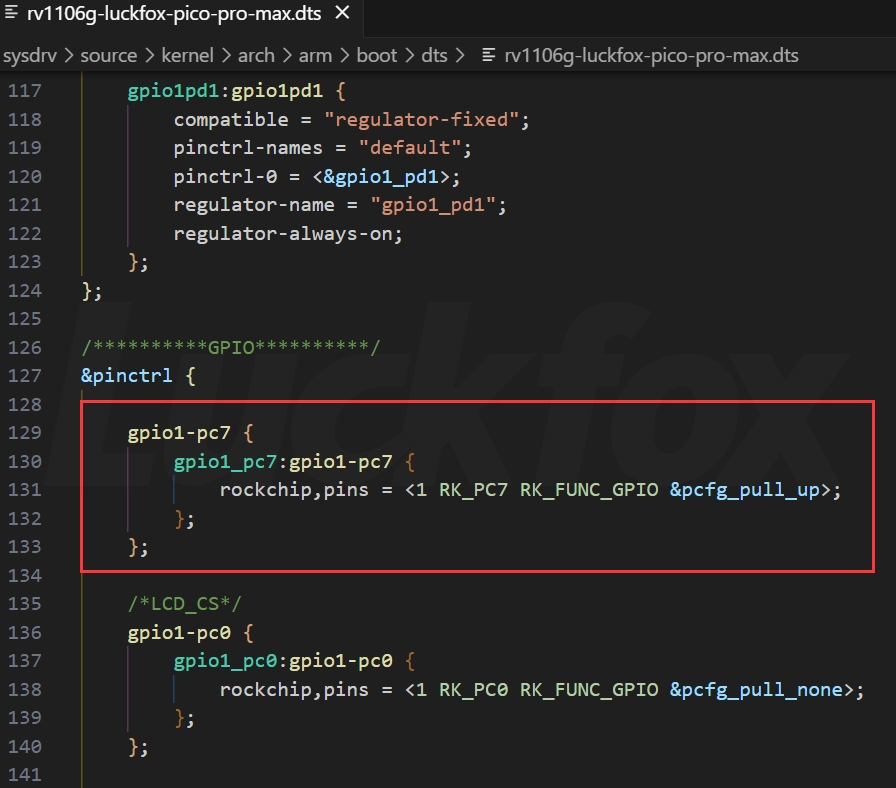
&pinctrl {
gpio1-pc7 {
gpio1_pc7:gpio1-pc7 {
rockchip,pins = <1 RK_PC7 RK_FUNC_GPIO &pcfg_pull_up>;
};
};
};
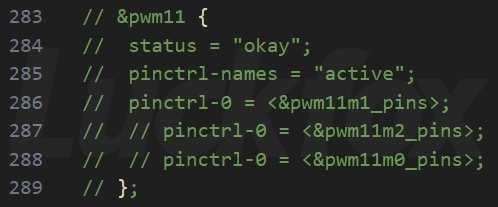
[] 注释引脚的外设功能
注释引脚外设功能可以通过在设备树中将相应的外设节点注释来实现,以下是一个示例,展示如何在设备树中禁用 GPIO1_C7_d 引脚的 PWM 功能。
[] 依次配置其余引脚
/ {
model = "Luckfox Pico Max";
compatible = "rockchip,rv1103g-38x38-ipc-v10", "rockchip,rv1106";
/*LCD_CS*/
gpio1pc0:gpio1pc0 {
compatible = "regulator-fixed";
pinctrl-names = "default";
pinctrl-0 = <&gpio1_pc0>;
regulator-name = "gpio1_pc0";
regulator-always-on;
};
/*LCD_BL*/
gpio2pb0:gpio2pb0 {
compatible = "regulator-fixed";
pinctrl-names = "default";
pinctrl-0 = <&gpio2_pb0>;
regulator-name = "gpio2_pb0";
regulator-always-on;
};
/*LCD_DC*/
gpio2pb1:gpio2pb1 {
compatible = "regulator-fixed";
pinctrl-names = "default";
pinctrl-0 = <&gpio2_pb1>;
regulator-name = "gpio2_pb1";
regulator-always-on;
};
/*LCD_RES*/
gpio1pc3:gpio1pc3 {
compatible = "regulator-fixed";
pinctrl-names = "default";
pinctrl-0 = <&gpio1_pc3>;
regulator-name = "gpio1_pc3";
regulator-always-on;
};
/*KEY*/
gpio2pa0:gpio2pa0 {
compatible = "regulator-fixed";
pinctrl-names = "default";
pinctrl-0 = <&gpio2_pa0>;
regulator-name = "gpio2_pa0";
regulator-always-on;
};
gpio2pa1:gpio2pa1 {
compatible = "regulator-fixed";
pinctrl-names = "default";
pinctrl-0 = <&gpio2_pa1>;
regulator-name = "gpio2_pa1";
regulator-always-on;
};
gpio2pa2:gpio2pa2 {
compatible = "regulator-fixed";
pinctrl-names = "default";
pinctrl-0 = <&gpio2_pa2>;
regulator-name = "gpio2_pa2";
regulator-always-on;
};
gpio2pa3:gpio2pa3 {
compatible = "regulator-fixed";
pinctrl-names = "default";
pinctrl-0 = <&gpio2_pa3>;
regulator-name = "gpio2_pa3";
regulator-always-on;
};
gpio2pa4:gpio2pa4 {
compatible = "regulator-fixed";
pinctrl-names = "default";
pinctrl-0 = <&gpio2_pa4>;
regulator-name = "gpio2_pa4";
regulator-always-on;
};
gpio2pa5:gpio2pa5 {
compatible = "regulator-fixed";
pinctrl-names = "default";
pinctrl-0 = <&gpio2_pa5>;
regulator-name = "gpio2_pa5";
regulator-always-on;
};
gpio1pc6:gpio1pc6 {
compatible = "regulator-fixed";
pinctrl-names = "default";
pinctrl-0 = <&gpio1_pc6>;
regulator-name = "gpio1_pc6";
regulator-always-on;
};
gpio1pc7:gpio1pc7 {
compatible = "regulator-fixed";
pinctrl-names = "default";
pinctrl-0 = <&gpio1_pc7>;
regulator-name = "gpio1_pc7";
regulator-always-on;
};
gpio1pd1:gpio1pd1 {
compatible = "regulator-fixed";
pinctrl-names = "default";
pinctrl-0 = <&gpio1_pd1>;
regulator-name = "gpio1_pd1";
regulator-always-on;
};
};
/**********GPIO**********/
&pinctrl {
gpio1-pc7 {
gpio1_pc7:gpio1-pc7 {
rockchip,pins = <1 RK_PC7 RK_FUNC_GPIO &pcfg_pull_up>;
};
};
/*LCD_CS*/
gpio1-pc0 {
gpio1_pc0:gpio1-pc0 {
rockchip,pins = <1 RK_PC0 RK_FUNC_GPIO &pcfg_pull_none>;
};
};
/*LCD_BL*/
gpio2-pb0 {
gpio2_pb0:gpio2-pb0 {
rockchip,pins = <2 RK_PB0 RK_FUNC_GPIO &pcfg_pull_none>;
};
};
/*LCD_DC*/
gpio2-pb1 {
gpio2_pb1:gpio2-pb1 {
rockchip,pins = <2 RK_PB1 RK_FUNC_GPIO &pcfg_pull_none>;
};
};
/*LCD_RES*/
gpio1-pc3 {
gpio1_pc3:gpio1-pc3 {
rockchip,pins = <1 RK_PC3 RK_FUNC_GPIO &pcfg_pull_none>;
};
};
/*KEY*/
gpio2-pa0 {
gpio2_pa0:gpio2-pa0 {
rockchip,pins = <2 RK_PA0 RK_FUNC_GPIO &pcfg_pull_up>;
};
};
gpio2-pa1 {
gpio2_pa1:gpio2-pa1 {
rockchip,pins = <2 RK_PA1 RK_FUNC_GPIO &pcfg_pull_up>;
};
};
gpio2-pa2 {
gpio2_pa2:gpio2-pa2 {
rockchip,pins = <2 RK_PA2 RK_FUNC_GPIO &pcfg_pull_up>;
};
};
gpio2-pa3 {
gpio2_pa3:gpio2-pa3 {
rockchip,pins = <2 RK_PA3 RK_FUNC_GPIO &pcfg_pull_up>;
};
};
gpio2-pa4 {
gpio2_pa4:gpio2-pa4 {
rockchip,pins = <2 RK_PA4 RK_FUNC_GPIO &pcfg_pull_up>;
};
};
gpio2-pa5 {
gpio2_pa5:gpio2-pa5 {
rockchip,pins = <2 RK_PA5 RK_FUNC_GPIO &pcfg_pull_up>;
};
};
gpio1-pc6 {
gpio1_pc6:gpio1-pc6 {
rockchip,pins = <1 RK_PC6 RK_FUNC_GPIO &pcfg_pull_up>;
};
};
gpio1-pc7 {
gpio1_pc7:gpio1-pc7 {
rockchip,pins = <1 RK_PC7 RK_FUNC_GPIO &pcfg_pull_up>;
};
};
gpio1-pd1 {
gpio1_pd1:gpio1-pd1 {
rockchip,pins = <1 RK_PD1 RK_FUNC_GPIO &pcfg_pull_up>;
};
};
};
【配置FB设备】
修改内容
| 项目 | 文件路径 |
| Kernel 设备树 | <SDK目录>/sysdrv/source/kernel/arch/arm/boot/dts/rv1106g-luckfox-pico-pro-max.dts |
| st7789V驱动支持 | <SDK目录>/sysdrv/source/kernel/arch/arm/configs/luckfox_rv1106_linux_defconfig |
| fbtft驱动更改 | <SDK目录>/sysdrv/source/kernel/drivers/staging/fbtft/fbtft-core.c |
Kernel 设备树
[] 文件路径
<SDK目录>/sysdrv/source/kernel/arch/arm/boot/dts/rv1106g-luckfox-pico-pro-max.dts
[] 设备树文件修改
注意先将原 spi0 配置注释掉,再添加以下配置:
&spi0 {
status = "okay";
pinctrl-names = "default";
pinctrl-0 = <&spi0m0_pins>;
// cs-gpios = <&gpio1 RK_PC0 1>;
// cs-gpios = <&gpio1 26 1>;
#address-cells = <1>;
#size-cells = <0>;
lcd: lcd@0{
status = "okay";
compatible = "sitronix,st7789v";
reg = <0>;
spi-max-frequency = <20000000>;
spi-cpol;
spi-cpha;
rotate = <0>;
fps = <30>;
rgb;
buswidth = <8>;
cs = <&gpio1 RK_PC0 GPIO_ACTIVE_LOW>; //spi0_miso
led = <&gpio2 RK_PB0 GPIO_ACTIVE_LOW>; //BL
dc = <&gpio2 RK_PB1 GPIO_ACTIVE_HIGH>; //DC
reset = <&gpio1 RK_PC3 GPIO_ACTIVE_LOW>; //RES
debug = <0x7>;
};
};
&pinctrl {
spi0 {
/omit-if-no-ref/
spi0m0_pins: spi0m0-pins {
rockchip,pins =
/* spi0_clk_m0 */
<1 RK_PC1 4 &pcfg_pull_none>,
/* spie_miso_m0 */
// <1 RK_PC3 6 &pcfg_pull_none>,
/* spi_mosi_m0 */
<1 RK_PC2 6 &pcfg_pull_none>;
};
};
};
st7789V驱动支持
[] 文件路径
<SDK目录>/sysdrv/source/kernel/arch/arm/configs/luckfox_rv1106_linux_defconfig
[] 编译驱动
添加以下内容:
# spi lcd -- st7789V
CONFIG_SPI_MASTER=y
CONFIG_SPI_DESIGNWARE=y
CONFIG_SPI_DW_MMIO=y
CONFIG_FB=y
CONFIG_FB_TFT=y
CONFIG_FB_TFT_ST7789V=y
fbtft驱动更改
[] 文件路径
<SDK目录>/sysdrv/source/kernel/drivers/staging/fbtft/fbtft-core.c
[] 修改内容
-> 添加头文件,用于获取dtsi中引脚的高低有效电平配置
#include <linux/gpio.h> //add
#include <linux/of_gpio.h> //add
-> 更改fbtft_request_one_gpio
static int fbtft_request_one_gpio(struct fbtft_par *par,
const char *name, int index,
struct gpio_desc **gpiop)
{
struct device *dev = par->info->device;
struct device_node *node = dev->of_node;
int gpio, flags, ret = 0;
enum of_gpio_flags of_flags;
if (of_find_property(node, name, NULL)) {
gpio = of_get_named_gpio_flags(node, name, index, &of_flags);
if (gpio == -ENOENT)
return 0;
if (gpio == -EPROBE_DEFER)
return gpio;
if (gpio < 0) {
dev_err(dev,
"failed to get '%s' from DT\n", name);
return gpio;
}
//active low translates to initially low
flags = (of_flags & OF_GPIO_ACTIVE_LOW) ? GPIOF_OUT_INIT_LOW :
GPIOF_OUT_INIT_HIGH;
ret = devm_gpio_request_one(dev, gpio, flags,
dev->driver->name);
if (ret) {
dev_err(dev,
"gpio_request_one('%s'=%d) failed with %d\n",
name, gpio, ret);
return ret;
}
*gpiop = gpio_to_desc(gpio);
fbtft_par_dbg(DEBUG_REQUEST_GPIOS, par, "%s: '%s' = GPIO%d\n",
__func__, name, gpio);
}
return ret;
}
-> 更改fbtft_reset,添加cs引脚设置
static void fbtft_reset(struct fbtft_par *par)
{
if (!par->gpio.reset)
return;
fbtft_par_dbg(DEBUG_RESET, par, "%s()\n", __func__);
gpiod_set_value_cansleep(par->gpio.reset, 1);
usleep_range(20, 40);
gpiod_set_value_cansleep(par->gpio.reset, 0);
msleep(120);
gpiod_set_value_cansleep(par->gpio.reset, 1);
msleep(120);
gpiod_set_value_cansleep(par->gpio.cs, 0); /* Activate chip */
msleep(120);
}
-> 改变led-gpio为led
static struct fbtft_platform_data *fbtft_properties_read(struct device *dev)
{
struct fbtft_platform_data *pdata;
if (!dev_fwnode(dev)) {
dev_err(dev, "Missing platform data or properties\n");
return ERR_PTR(-EINVAL);
}
pdata = devm_kzalloc(dev, sizeof(*pdata), GFP_KERNEL);
if (!pdata)
return ERR_PTR(-ENOMEM);
pdata->display.width = fbtft_property_value(dev, "width");
pdata->display.height = fbtft_property_value(dev, "height");
pdata->display.regwidth = fbtft_property_value(dev, "regwidth");
pdata->display.buswidth = fbtft_property_value(dev, "buswidth");
pdata->display.backlight = fbtft_property_value(dev, "backlight");
pdata->display.bpp = fbtft_property_value(dev, "bpp");
pdata->display.debug = fbtft_property_value(dev, "debug");
pdata->rotate = fbtft_property_value(dev, "rotate");
pdata->bgr = device_property_read_bool(dev, "bgr");
pdata->fps = fbtft_property_value(dev, "fps");
pdata->txbuflen = fbtft_property_value(dev, "txbuflen");
pdata->startbyte = fbtft_property_value(dev, "startbyte");
device_property_read_string(dev, "gamma", (const char **)&pdata->gamma);
if (device_property_present(dev, "led"))
pdata->display.backlight = 1;
if (device_property_present(dev, "init"))
pdata->display.fbtftops.init_display =
fbtft_init_display_from_property;
pdata->display.fbtftops.request_gpios = fbtft_request_gpios;
return pdata;
}
验证fb设备
[] 查看fb驱动是否正常加载
完成以上修改后,重新编译并烧录镜像。上电后可以执行dmesg查看fb驱动是否正常加载:
# dmesg | grep fb_
[ 0.689762] fb_st7789v spi0.0: fbtft_write_spi(len=1): e1
[ 0.689858] fb_st7789v spi0.0: fbtft_write_spi(len=14): d0 05 0a 09 08 05 2e 43 45 0f 16 16 2b 33
[ 0.690526] graphics fb0: fb_st7789v frame buffer, 240x320, 150 KiB video memory, 4 KiB buffer memory, fps=30, spi0.0 at 20 MHz
[ 0.690562] fb_st7789v spi0.0: fbtft_backlight_update_status: polarity=1, power=0, fb_blank=0
[] 测试花屏:
cat /dev/urandom > /dev/fb0
[] 测试清屏:
cat /dev/zero > /dev/fb0
如果花屏、清屏功能正常,则说明驱动可以正常加载。
【移植LVGL】
所需资源
| 资源名称 | 仓库地址 | 描述 |
| lvgl | https://github.com/lvgl/lvgl.git | LVGL图形界面控件的源码以及少量例程 |
| lv_drivers | https://github.com/lvgl/lv_drivers.git | 驱动LVGL图形界面的驱动接口源代码 |
| lv_demos | https://github.com/lvgl/lv_demos.git | LVGL的例程 |
| lv_port_linux_frame_buffer | https://github.com/lvgl/lv_port_linux_frame_buffer.git | 适配有Framebuffer的linux系统的接口 |
拉取资源
[] 在根目录下创建一个文件夹存放官方源码:
luckfox@luckfox:~$ mkdir lvgl
luckfox@luckfox:~$ cd lvgl
[] 拉取资源:
git clone -b v8.1.0 https://github.com/lvgl/lvgl.git
git clone -b v8.1.0 https://github.com/lvgl/lv_drivers.git
git clone -b v8.1.0 https://github.com/lvgl/lv_demos.git
git clone --branch release/v8.2 --single-branch https://github.com/lvgl/lv_port_linux_frame_buffer.git
[] 成功拉取后,在根目录下创建一个工程目录,并创建一个工程:
luckfox@luckfox:~$ mkdir lvgl_project
luckfox@luckfox:~$ cd lvgl_project/
luckfox@luckfox:~/lvgl_project$ mkdir project_01
luckfox@luckfox:~/lvgl_project$ cd project_01/
复制文件
复制根目录下的 lvgl 文件夹中的 lvgl、lv_drivers 目录
复制 lv_port_linux_frame_buffer 中的 main.c 与 Makefile
复制 lvgl 中的 lv_conf_template.h 重命名为 lv_conf.h
复制 lv_drivers 中的 lv_drv_conf_template.h 重命名为 lv_drv_conf.h
cp -r ~/lvgl/lvgl ./
cp -r ~/lvgl/lv_drivers ./
cp ~/lvgl/lvgl/lv_conf_template.h ./lv_conf.h
cp ~/lvgl/lv_drivers/lv_drv_conf_template.h ./lv_drv_conf.h
cp ~/lvgl/lv_port_linux_frame_buffer/main.c ./
cp ~/lvgl/lv_port_linux_frame_buffer/Makefile ./
查看 project_01 工程目录下文件:
luckfox@luckfox:~/lvgl_project/project_01$ ls -l
总用量 64
-rw-rw-r-- 1 luckfox luckfox 29023 12月 27 19:14 lv_conf.h
drwxrwxr-x 12 luckfox luckfox 4096 12月 27 19:14 lv_drivers
-rw-rw-r-- 1 luckfox luckfox 15184 12月 27 19:14 lv_drv_conf.h
drwxrwxr-x 12 luckfox luckfox 4096 12月 27 19:14 lvgl
-rw-rw-r-- 1 luckfox luckfox 2350 12月 27 19:14 main.c
-rw-rw-r-- 1 luckfox luckfox 2321 12月 27 19:14 Makefile
修改文件
-> lv_conf.h
[] 使能
将一开始的 #if 0 改成 #if 1
/* clang-format off */
#if 1 /*Set it to "1" to enable content*/
[] 分配显存
使能 LV_MEM_CUSTOM ,选择自行分配显存
/*1: use custom malloc/free, 0: use the built-in `lv_mem_alloc()` and `lv_mem_free()`*/
#define LV_MEM_CUSTOM 1
[] 刷新时间
将原本的 30ms 调整成了 10ms
/*Default display refresh period. LVG will redraw changed areas with this period time*/
#define LV_DISP_DEF_REFR_PERIOD 10 /*[ms]*/
/*Input device read period in milliseconds*/
#define LV_INDEV_DEF_READ_PERIOD 10 /*[ms]*/
[] TICK配置
使能 LV_TICK_CUSTOM ,选择在应用程序中自定义 Tick 定时器配置函数
原内容:
#define LV_TICK_CUSTOM 0
#if LV_TICK_CUSTOM
#define LV_TICK_CUSTOM_INCLUDE "Arduino.h" /*Header for the system time function*/
#define LV_TICK_CUSTOM_SYS_TIME_EXPR (millis()) /*Expression evaluating to current system time in ms*/
#endif /*LV_TICK_CUSTOM*/
更改为:
#define LV_TICK_CUSTOM 1
#if LV_TICK_CUSTOM
#define LV_TICK_CUSTOM_INCLUDE <stdint.h> /*Header for the system time function*/
#define LV_TICK_CUSTOM_SYS_TIME_EXPR (custom_tick_get()) /*Expression evaluating to current system time in ms*/
#endif /*LV_TICK_CUSTOM*/
-> lv_drv_conf.h
[] 使能
将一开始的 #if 0 改成 #if 1
/* clang-format off */
#if 1 /*Set it to "1" to enable the content*/
[] 支持设备
使能 USE_FBDEV ,支持Framebuffer设备
/*-----------------------------------------
* Linux frame buffer device (/dev/fbx)
*-----------------------------------------*/
#ifndef USE_FBDEV
# define USE_FBDEV 1
#endif
#if USE_FBDEV
# define FBDEV_PATH "/dev/fb0"
#endif
-> Makefile
替换原 Makefile 内容,将 Makefile 中 <SDK Directory> 修改为自己的 SDK 路径,如 /home/luckfox/luckfox-pico/
#
# Makefile
#
CC = <SDK Directory>/tools/linux/toolchain/arm-rockchip830-linux-uclibcgnueabihf/bin/arm-rockchip830-linux-uclibcgnueabihf-gcc
LVGL_DIR_NAME ?= lvgl
LVGL_DIR ?= .
WARNINGS := -Wall -Wshadow -Wundef -Wmissing-prototypes -Wno-discarded-qualifiers -Wall -Wextra -Wno-unused-function -Wno-error=strict-prototypes -Wpointer-arith \
-fno-strict-aliasing -Wno-error=cpp -Wuninitialized -Wmaybe-uninitialized -Wno-unused-parameter -Wno-missing-field-initializers -Wtype-limits -Wsizeof-pointer-memaccess \
-Wno-format-nonliteral -Wno-cast-qual -Wunreachable-code -Wno-switch-default -Wreturn-type -Wmultichar -Wformat-security -Wno-ignored-qualifiers -Wno-error=pedantic \
-Wno-sign-compare -Wno-error=missing-prototypes -Wdouble-promotion -Wclobbered -Wdeprecated -Wempty-body -Wtype-limits -Wshift-negative-value -Wstack-usage=2048 \
-Wno-unused-value -Wno-unused-parameter -Wno-missing-field-initializers -Wuninitialized -Wmaybe-uninitialized -Wall -Wextra -Wno-unused-parameter \
-Wno-missing-field-initializers -Wtype-limits -Wsizeof-pointer-memaccess -Wno-format-nonliteral -Wpointer-arith -Wno-cast-qual -Wmissing-prototypes \
-Wunreachable-code -Wno-switch-default -Wreturn-type -Wmultichar -Wno-discarded-qualifiers -Wformat-security -Wno-ignored-qualifiers -Wno-sign-compare -std=c99
CFLAGS ?= -O3 -g0 -I$(LVGL_DIR)/ $(WARNINGS)
LDFLAGS ?= -lm
BIN = demo
BUILD_DIR = ./build
BUILD_OBJ_DIR = $(BUILD_DIR)/obj
BUILD_BIN_DIR = $(BUILD_DIR)/bin
prefix ?= /usr
bindir ?= $(prefix)/bin
#Collect the files to compile
MAINSRC = $(wildcard ./*.c)
include $(LVGL_DIR)/lvgl/lvgl.mk
include $(LVGL_DIR)/lv_drivers/lv_drivers.mk
# CSRCS +=$(LVGL_DIR)/mouse_cursor_icon.c
OBJEXT ?= .o
AOBJS = $(ASRCS:.S=$(OBJEXT))
COBJS = $(CSRCS:.c=$(OBJEXT))
MAINOBJ = $(MAINSRC:.c=$(OBJEXT))
SRCS = $(ASRCS) $(CSRCS) $(MAINSRC)
OBJS = $(AOBJS) $(COBJS) $(MAINOBJ)
TARGET = $(addprefix $(BUILD_OBJ_DIR)/, $(patsubst ./%, %, $(OBJS)))
## MAINOBJ -> OBJFILES
all: default
$(BUILD_OBJ_DIR)/%.o: %.c
@mkdir -p $(dir $@)
@$(CC) $(CFLAGS) -c $< -o $@
@echo "CC $<"
default: $(TARGET)
@mkdir -p $(dir $(BUILD_BIN_DIR)/)
$(CC) -o $(BUILD_BIN_DIR)/$(BIN) $(TARGET) $(LDFLAGS)
clean:
rm -rf $(BUILD_DIR)
install:
install -d $(DESTDIR)$(bindir)
install $(BUILD_BIN_DIR)/$(BIN) $(DESTDIR)$(bindir)
uninstall:
$(RM) -r $(addprefix $(DESTDIR)$(bindir)/,$(BIN))
-> main.c
[] 注释头文件
// #include "lvgl/demos/lv_demos.h"
// #include "lv_drivers/indev/evdev.h"
[] 修改屏幕分辨率
#define DISP_BUF_SIZE (240 * 240)
...
disp_drv.hor_res = 240;
disp_drv.ver_res = 240;
[] 注释下面代码
无外部输入设备,注释下面代码:
evdev_init();
static lv_indev_drv_t indev_drv_1;
lv_indev_drv_init(&indev_drv_1); /*Basic initialization*/
indev_drv_1.type = LV_INDEV_TYPE_POINTER;
/*This function will be called periodically (by the library) to get the mouse position and state*/
indev_drv_1.read_cb = evdev_read;
lv_indev_t *mouse_indev = lv_indev_drv_register(&indev_drv_1);
未移植鼠标样式,注释下面代码:
/*Set a cursor for the mouse*/
LV_IMG_DECLARE(mouse_cursor_icon)
lv_obj_t * cursor_obj = lv_img_create(lv_scr_act()); /*Create an image object for the cursor */
lv_img_set_src(cursor_obj, &mouse_cursor_icon); /*Set the image source*/
lv_indev_set_cursor(mouse_indev, cursor_obj); /*Connect the image object to the driver*/
不使用官方demo,注释下面代码:
/*Create a Demo*/
lv_demo_widgets();
编译和运行
上述文件修改完成后,在命令行输入 make 命令编译工程,编译完成后会在 /build/bin 目录下生成一个可执行文件 demo ,编译后的目录结构如下:
project_01/
├── build
│ ├── bin
│ │ └── demo
│ └── obj
│ ├── lv_drivers
│ ├── lvgl
│ └── ...
├── lv_conf.h
├── lv_drivers
├── lv_drv_conf.h
├── lvgl
├── main.c
└── Makefile
我们只需要将 demo 拷贝至开发板,即可在板子上运行程序。后续可以根据需求自行修改 main.c 文件和添加文件,实现自己想要的显示效果。
官方demo
若需要使用官方提供的例程,按照下面步骤进行操作:
[] 复制文件
复制根目录下的 lvgl 文件夹中的 lv_demos 目录
复制 lv_demos 中的 lv_demo_conf_template.h 重命名为 lv_demo_conf.h
cp -r ~/lvgl/lv_demos ./
cp ~/lvgl/lv_demos/lv_demo_conf_template.h ./lv_demo_conf.h
[] 修改 lv_demo_conf.h
-> 使能
/* clang-format off */
#if 1 /*Set it to "1" to enable the content*/
-> 使能 widget demo
/*Show some widget*/
#define LV_USE_DEMO_WIDGETS 1
[] 修改 lv_conf.h
使能 LV_FONT_MONTSERRAT_12 和 LV_FONT_MONTSERRAT_16
#define LV_FONT_MONTSERRAT_12 1
#define LV_FONT_MONTSERRAT_16 1
[] Makefile
include $(LVGL_DIR)/lvgl/lvgl.mk
include $(LVGL_DIR)/lv_drivers/lv_drivers.mk
#Add lv_demo.mk:
include $(LVGL_DIR)/lv_demos/lv_demo.mk
[] 修改 main.c
-> 添加头文件
#include "lv_demos/lv_demo.h"
-> 调用接口函数
lv_demo_widgets();
while(1) {
lv_timer_handler();
usleep(5000);
}
【示例程序】
工程目录
烧录好镜像,创建好工程文件后,就可以开始自行修改程序了,这里我们使用 Luckfox Pico Pro/Max 开发板和 Pico-LCD-1.3 显示屏实现界面显示,修改后的工程目录如下:
lvgl_demo/
├── cat.c -------------------- 图片转换后得到的文件
├── galaxy.c ----------------- 图片转换后得到的文件
├── Luckfox.c ---------------- 图片转换后得到的文件
├── saint.c ------------------ 图片转换后得到的文件
├── main.c ------------------- 主程序文件
├── Debug.h ------------------ 调试信息头文件
├── DEV_Config.c ------------- GPIO 控制接口文件
├── DEV_Config.h ------------- GPIO 控制接口头文件
├── sysfs_gpio.c ------------- sysfs GPIO 控制实现文件
├── sysfs_gpio.h ------------- sysfs GPIO 控制头文件
└── ...
显示自定义图片
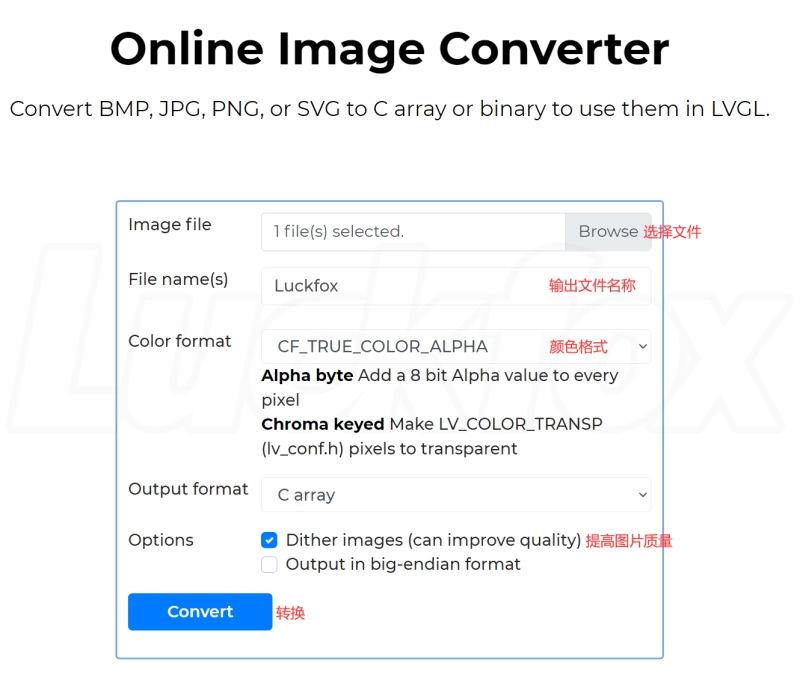
[] 在线转换
Online Image Converter
[] 转换图片
注意,PNG图片颜色格式选择CF_TRUE_COLOR_ALPHA,JPG图片颜色格式选择CF_TRUE_COLOR,转换完成后将c文件拷贝至工程目录
[] 修改main.c
添加声明
LV_IMG_DECLARE(Luckfox);
显示图片
lv_obj_t *scr = lv_disp_get_scr_act(NULL);
lv_obj_t *img = lv_img_create(scr);
lv_show_img(img,Luckfox);
lv_obj_center(img);
主程序
-> main.c
#include "lvgl/lvgl.h"
#include "DEV_Config.h"
#include "lv_drivers/display/fbdev.h"
#include <unistd.h>
#include <pthread.h>
#include <time.h>
#include <sys/time.h>
#define DISP_BUF_SIZE (240 * 240)
/*Image declare*/
LV_IMG_DECLARE(Luckfox);
LV_IMG_DECLARE(cat);
LV_IMG_DECLARE(galaxy);
LV_IMG_DECLARE(saint);
void fbdev_flush(lv_disp_drv_t * drv, const lv_area_t * area, lv_color_t * color_p);
/**
* A meter with multiple arcs
*/
void lv_show_img(lv_obj_t * img,const lv_img_dsc_t img_dat){
lv_obj_clean(img);
lv_img_set_src(img, &img_dat);
lv_obj_center(img);
}
int main(void)
{
/*LittlevGL init*/
lv_init();
/*Linux frame buffer device init*/
fbdev_init();
/*A small buffer for LittlevGL to draw the screen's content*/
static lv_color_t buf[DISP_BUF_SIZE];
/*Initialize a descriptor for the buffer*/
static lv_disp_draw_buf_t disp_buf;
lv_disp_draw_buf_init(&disp_buf, buf, NULL, DISP_BUF_SIZE);
/*Initialize and register a display driver*/
static lv_disp_drv_t disp_drv;
lv_disp_drv_init(&disp_drv);
disp_drv.draw_buf = &disp_buf;
disp_drv.flush_cb = fbdev_flush;
disp_drv.hor_res = 240;
disp_drv.ver_res = 240;
lv_disp_drv_register(&disp_drv);
/*Initialize pin*/
DEV_ModuleInit();
/*Show an image*/
lv_obj_t *scr = lv_disp_get_scr_act(NULL);
lv_obj_t *img = lv_img_create(scr);
lv_show_img(img,Luckfox);
lv_obj_center(img);
/*Create a cursor*/
lv_obj_t *cursor = lv_img_create(scr);
lv_img_set_src(cursor, LV_SYMBOL_GPS);
lv_obj_set_pos(cursor, 70, 120);
int x=70,y=120,move=0;
/*Handle LitlevGL tasks (tickless mode)*/
while(1) {
lv_timer_handler();
usleep(5000);
/*Key*/
if(GET_KEYA == 0){
lv_show_img(img,Luckfox);
}
else if(GET_KEYB == 0){
lv_show_img(img,cat);
}
else if(GET_KEYX == 0){
lv_show_img(img,galaxy);
}
else if(GET_KEYY == 0){
lv_show_img(img,saint);
}
/*Joystick*/
if(GET_KEY_UP == 0){
x += 1;
if(x > 226)x = 226;
move =1;
}
else if(GET_KEY_DOWN == 0){
x -= 1;
if(x < 0)x = 0;
move =1;
}
else if(GET_KEY_LEFT == 0){
y -= 1;
if(y < 0)y = 0;
move =1;
}
else if(GET_KEY_RIGHT == 0){
y += 1;
if(y > 224)y = 224;
move =1;
}
else if(GET_KEY_PRESS == 0){
x = 70;
y = 120;
move =1;
}
if(move == 1){
lv_obj_set_pos(cursor, x, y);
move = 0;
}
}
return 0;
}
/*Set in lv_conf.h as `LV_TICK_CUSTOM_SYS_TIME_EXPR`*/
uint32_t custom_tick_get(void)
{
static uint64_t start_ms = 0;
if(start_ms == 0) {
struct timeval tv_start;
gettimeofday(&tv_start, NULL);
start_ms = (tv_start.tv_sec * 1000000 + tv_start.tv_usec) / 1000;
}
struct timeval tv_now;
gettimeofday(&tv_now, NULL);
uint64_t now_ms;
now_ms = (tv_now.tv_sec * 1000000 + tv_now.tv_usec) / 1000;
uint32_t time_ms = now_ms - start_ms;
return time_ms;
}
[] 代码解析:
图片声明
依次声明程序中将要使用的图片
/*Image declare*/
LV_IMG_DECLARE(Luckfox);
LV_IMG_DECLARE(cat);
LV_IMG_DECLARE(galaxy);
LV_IMG_DECLARE(saint);
引脚初始化
调用接口,初始化 LCD 的控制引脚
/*Initialize pin*/
DEV_ModuleInit();
显示图片
这段代码的作用是在LVGL图形界面中显示一张图片,并将该图片居中显示在当前活动的屏幕上
/*Show an image*/
lv_obj_t *scr = lv_disp_get_scr_act(NULL);
lv_obj_t *img = lv_img_create(scr);
lv_show_img(img,Luckfox);
lv_obj_center(img);
-> lv_disp_get_scr_act(NULL): 获取当前活动的屏幕对象。lv_obj_t *scr 指向该屏幕对象。
-> lv_img_create(scr): 在屏幕对象上创建一个图像对象。lv_obj_t *img 指向创建的图像对象。
-> lv_show_img(img, Luckfox): 在创建的图像对象上显示名为 Luckfox 的图片。
-> lv_obj_center(img): 将图像对象居中放置在屏幕上。
当用户分别按下按键A、B、X、Y时,控制 LCD 显示不同的图片
/*Key*/
if(GET_KEYA == 0){
lv_show_img(img,Luckfox);
}
else if(GET_KEYB == 0){
lv_show_img(img,cat);
}
else if(GET_KEYX == 0){
lv_show_img(img,galaxy);
}
else if(GET_KEYY == 0){
lv_show_img(img,saint);
}
显示光标
这段代码的目的是创建一个光标对象,并设置光标的位置和图像源。
/*Create a cursor*/
lv_obj_t *cursor = lv_img_create(scr);
lv_img_set_src(cursor, LV_SYMBOL_GPS);
lv_obj_set_pos(cursor, 70, 120);
int x=70,y=120,move=0;
-> lv_img_create(scr): 在屏幕对象上创建一个图像对象,lv_obj_t *cursor 指向创建的图像对。这个图像对象将用作光标。
-> lv_img_set_src(cursor, LV_SYMBOL_GPS): 设置光标的图像源为GPS符号。 LV_SYMBOL_GPS 是LVGL库中定义的一个GPS符号。
-> lv_obj_set_pos(cursor, 70, 120): 设置光标的位置为 (70, 120)。
-> int x=70, y=120, move=0;: 定义了三个变量,分别表示光标的初始横坐标 x、纵坐标 y,以及移动标志 move。
这段代码实现通过手柄控制光标在屏幕上的位置,当用户操作手柄时x、y值会根据方向进行变化,然后将 move 标志置1,后续在判断 move 标志为1时重新显示光标位置,即可实现光标移动的效果。
/*Joystick*/
if(GET_KEY_UP == 0){
x += 1;
if(x > 226)x = 226;
move =1;
}
else if(GET_KEY_DOWN == 0){
x -= 1;
if(x < 0)x = 0;
move =1;
}
else if(GET_KEY_LEFT == 0){
y -= 1;
if(y < 0)y = 0;
move =1;
}
else if(GET_KEY_RIGHT == 0){
y += 1;
if(y > 224)y = 224;
move =1;
}
else if(GET_KEY_PRESS == 0){
x = 70;
y = 120;
move =1;
}
if(move == 1){
lv_obj_set_pos(cursor, x, y);
move = 0;
}
实现效果
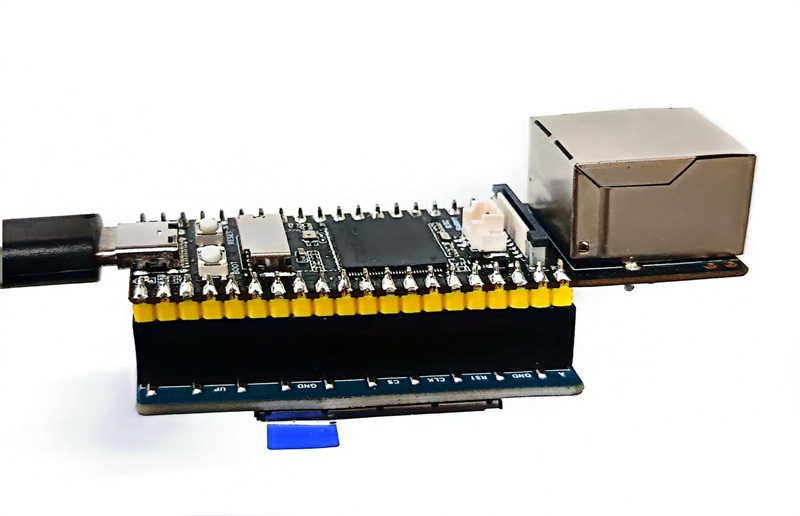
[] 硬件连接
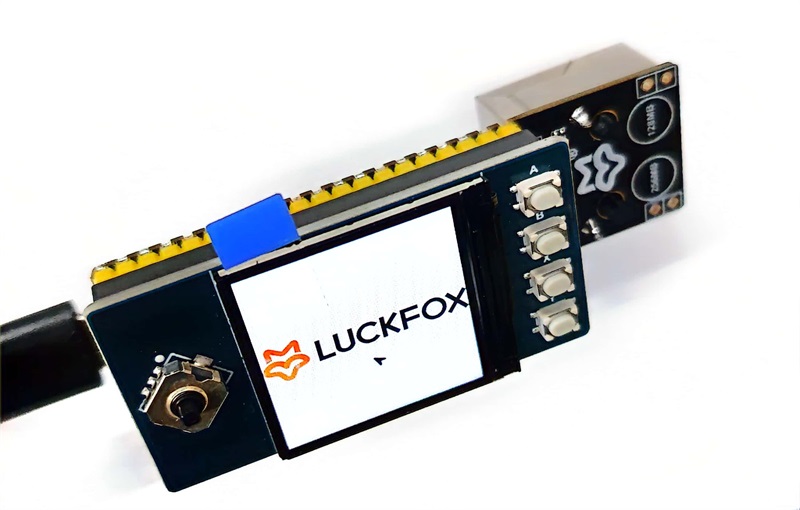
[] 显示效果


价格:
¥39.9/44.44/59.59/64.64
型号:
Luckfox-Pico
制造商:
斑梨电子
SKU:
0803004