ESP32 C3 0.42LCD gif_01图形测试
一、创建一个项目文件夹
二、打开arduino IDE
三.选择芯片
1、点击tools
2、点击board
3、点击esp32 ,选择esp32-c3
四.配置所需文件
1、保存,将文件保存在自己创建的文件夹中
2、将此(sprial_72x40.h文件:https://docs.qq.com/document/DVXd3bUx5dVhCQXpw) 文件下载,放入工程项目的文件夹中。

五.烧录代码
#include<Wire.h>
#include<OneBitDisplay.h>
#include<AnimatedGIF.h>
// Compile the GIF file animation into FLASH with the code
#include"spiral_72x40.h"
ONE_BIT_DISPLAY obd;
AnimatedGIF gif;
staticuint8_t*pBuffer;// holds current frame for OLED
#defineDISPLAY_WIDTH72
#defineDISPLAY_HEIGHT40
#ifdefARDUINO_ARCH_MBED
#defineSDA_PIN22
#defineSCL_PIN23
externMbedI2C *pWire;
#else
externTwoWire *pWire;
#defineSDA_PIN5
#defineSCL_PIN6
#endif
voidDrawPixel(intx,inty,uint8_tucColor)
{
uint8_tucMask;
intindex;
if(x >= DISPLAY_WIDTH || y >= DISPLAY_HEIGHT)
return;
ucMask =1<<(y &7);
index = x +((y >>3)* DISPLAY_WIDTH);
if(ucColor)
pBuffer[index] |= ucMask;// set the pixel (white)
else
pBuffer[index] &= ~ucMask;// clear the pixel (black)
}
//
// Called once per scanline as the GIF is decoded
//
voidGIFDraw(GIFDRAW*pDraw)
{
uint8_t*s;
intx, y, iWidth;
staticuint8_tucPalette[256];// thresholded palette
if(pDraw->y==0)// first line, convert palette to 0/1
{
for(x =0; x <256; x++)
{
uint16_tusColor =pDraw->pPalette[x];
intgray =(usColor & 0xf800)>>8;// red
gray +=((usColor & 0x7e0)>>2);// plus green*2
gray +=((usColor & 0x1f)<<3);// plus blue
ucPalette[x] =(gray >>9);// 0->511 = 0, 512->1023 = 1
}
}
y =pDraw->iY+pDraw->y;// current line
iWidth =pDraw->iWidth;
if(iWidth > DISPLAY_WIDTH)
iWidth = DISPLAY_WIDTH;
s =pDraw->pPixels;
if(pDraw->ucDisposalMethod==2)// restore to background color
{
for(x=0; x<iWidth; x++)
{
if(s[x] ==pDraw->ucTransparent)
s[x] =pDraw->ucBackground;
}
pDraw->ucHasTransparency=0;
}
// Apply the new pixels to the main image
if(pDraw->ucHasTransparency)// if transparency used
{
uint8_tc, ucTransparent =pDraw->ucTransparent;
intx;
for(x=0; x < iWidth; x++)
{
c = *s++;
if(c != ucTransparent)
DrawPixel(pDraw->iX+ x, y,ucPalette[c]);
}
}
else
{
s =pDraw->pPixels;
// Translate the 8-bit pixels through the RGB565 palette (already byte reversed)
for(x=0; x<pDraw->iWidth; x++)
DrawPixel(pDraw->iX+ x, y,ucPalette[*s++]);
}
if(pDraw->y==pDraw->iHeight-1)// last line, render it to the display
obd.display();
}/* GIFDraw() */
voidsetup(){
obd.setI2CPins(SDA_PIN, SCL_PIN);
obd.I2Cbegin(OLED_72x40);
obd.allocBuffer();
pBuffer =(uint8_t*)obd.getBuffer();
obd.fillScreen(0);
obd.setFont(FONT_8x8);
//obd.setContrast(40);
obd.print("GIF Demo");
obd.display();
delay(2000);
gif.begin(LITTLE_ENDIAN_PIXELS);
}/* setup() */
voidloop(){
// Loop continuously over the animated sequence
if(gif.open((uint8_t*)spiral_72x40, sizeof(spiral_72x40), GIFDraw))// play the GIF from FLASH storage
{
// Serial.printf("Successfully opened GIF; Canvas size = %d x %d\n", gif.getCanvasWidth(), gif.getCanvasHeight());
while(gif.playFrame(false,NULL))
{
}
gif.close();
}
}/* loop() */
1将代码复制到Arduino IDE中
2用type-c线将电脑和esp 32-c3开发板连接,连接成功后,会在电脑管理窗口显示串口
3在Arduino IDE中点击Tools,然后点击Port,选择串口Adafruit QT ESP32-C3
4点击Verfy
5点击upload
6等待上传
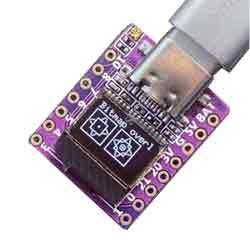
7.测试结果如下