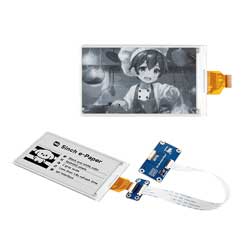
5inch e-Paper使用教程
产品特性
- 无需背光,断电可长时间保持最后一屏的显示内容
- 功耗非常低,基本只在刷新时耗电
- 提供完善的配套资料手册:驱动板原理图、Raspberry Pi / Jetson Nano / Arduino / STM32 / ESP32 等示例程序
- 以下仅适用于模块版
- 基于 Raspberry Pi 40PIN GPIO 接口设计,适用于 Raspberry Pi、Jetson Nano
- 预留 SPI 通信接口,方便接入 Raspberry Pi / Arduino / STM32 / ESP32 等主控板
- 板载电平转换芯片,可兼容 3.3V 和 5V 电平接口
各项参数
| 参数名称 | 参数 |
|---|---|
| 工作电压 | 裸屏版:3.3V 模块版:3.3V/5V |
| 通信接口 | 3-wire SPI、4-wire SPI |
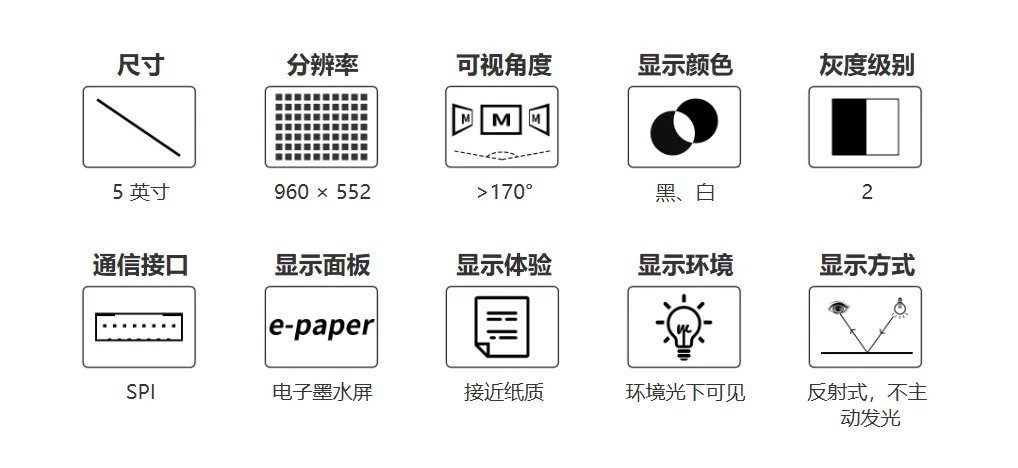
| 外形尺寸 | 裸屏版:126.38 × 71.19 × 0.795 mm 模块版:30.5 × 65mm |
| 显示尺寸 | 110.592 × 62.652 mm |
| 点距 | 0.1833 × 0.1833 mm |
| 分辨率 | 960 × 552pixels |
| 显示颜色 | 黑、白 |
| 灰度等级 | 2 |
| 局部刷新 | 0.7 |
| 全局刷新 | 1.8s |
| 刷新功耗 | < 50mW |
| 休眠电流 | < 0.01uA (接近 0) |
| 可视角度 | > 170° |
| 工作温度 | 0 ~ 50 ℃ |
| 存储温度 | -25 ~ 60 ℃ |
- 刷新时间:刷新时间为实验测试数据,实际刷新时间会有误差,以实际效果为准。全局刷新过程中会有闪烁效果,这个是正常现象。
- 刷新功耗:功耗数据为实验测试数据,实际功耗由于驱动板的存在和实际使用情况不同,会有一定误差,以实际效果为准。
- 在低温环境下进行刷新可能出现显示偏色,需要在 25℃的环境中静止 6 小时后,在进行刷新。
通信方式
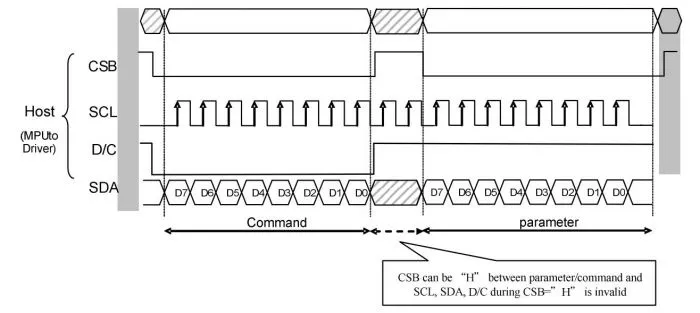
- CSB(CS):从机片选信号,低电平有效,为低电平的时候,芯片使能。
- SCL(SCK/SCLK):串行时钟信号。
- D/C(DC):数据/命令控制信号,低电平时写入命令(Command);高电平时写入数据(Data/parameter)。
- SDA(DIN):串行数据信号。
- 时序:CPHL=0,CPOL=0,即 SPI 模式 0。
- 【备注】具体关于 SPI 通信的相关信息,可以自行网上搜索资料了解。
工作原理
本产品使用的电子纸采用“微胶囊电泳显示”技术进行图像显示,其基本原理是悬浮在液体中的带电纳米粒子受到电场作用而产生迁移。电子纸显示屏是靠反射环境光来显示图案的,不需要背光,在环境光下,电子纸显示屏清晰可视,可视角度几乎达到了 180°。因此,电子纸显示屏非常适合阅读。
编程原理
- 对于黑白图片,我们可以规定,如果如果是黑色我们定义成 0,如果是白色就定义成 1,那么有了表示颜色的方式:
- 白色:□,对应 1
- 黑色:■:对应 0
- 一个点在图形上一般称之为像素点(pixel), 而颜色不是 1 就是 0,也就是 1 个位就可以标识颜色:1Pixel = 1bit,那么一个字节里面就包含了 8 个像素点。
- 以 16 个像素点为例,我们假设前 8 个像素点为黑,后 8 个像素点为白色,那么可以这么认为,像素点 1-16,对应这 0 位到 15 位,0 表示黑色,1 表示白色:对于计算机而言,它的数据存储方式是高位在前,低位在后,且一个字节只有 8 个位,因此会有一点改变:
 这样只需要 2 个字节即可表示 16 个像素点了。
Raspberry Pi 使用说明
硬件连接
- 连接树莓派的时候,可以直接将板子插到树莓派的 40PIN 排针上去,注意对好引脚。
- 如果是选择用 9PIN 排线连接的话,请参考下方的引脚对应表格:
- 树莓派连接引脚对应关系
e-Paper 树莓派连接引脚对应关系 BCM2835 编码 Board 物理引脚序号 VCC 3.3V 3.3V GND GND GND DIN MOSI 19 CLK SCLK 23 CS CE0 24 DC 25 22 RST 17 11 BUSY 24 18 PWR 18 12
- 树莓派连接引脚对应关系
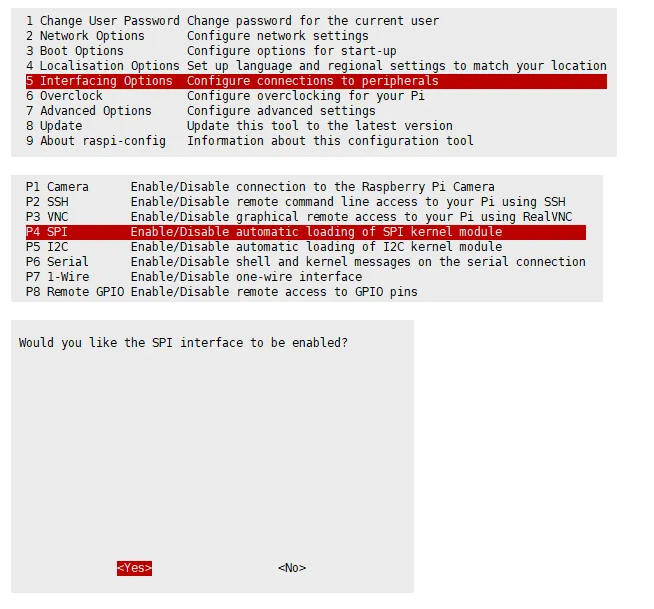
开启 SPI 接口
打开树莓派终端,输入以下指令进入配置界面:
sudo raspi-config选择 Interfacing Options -> SPI -> Yes 开启 SPI 接口
重启树莓派:
sudo reboot检查
/boot/config.txt,可以看到dtparam=spi=on已被写入
为了确保 SPI 没有被占用,建议其他的驱动覆盖暂时先关闭。可以使用
ls /dev/spi*来检查 SPI 占用情况,终端输出/dev/spidev0.0和/dev/spidev0.1表示 SPI 情况正常
运行 C 语言例程
安装 lg 库
#打开树莓派终端,并运行以下指令:wget https://github.com/joan2937/lg/archive/master.zipunzip master.zipcd lg-mastermakesudo make install# 更多的可以参考源码:https://github.com/gpiozero/lg安装 gpiod 库(可选)
#打开树莓派终端,并运行以下指令:sudo apt-get updatesudo apt install gpiod libgpiod-dev安装 BCM2835(可选)
#打开树莓派终端,并运行以下指令:wget http://www.airspayce.com/mikem/bcm2835/bcm2835-1.71.tar.gztar zxvf bcm2835-1.71.tar.gzcd bcm2835-1.71/sudo ./configure && sudo make && sudo make check && sudo make install# 更多的可以参考官网:http://www.airspayce.com/mikem/bcm2835/安装 wiringPi(可选)
#打开树莓派终端,并运行以下指令:sudo apt-get install wiringpi#对于树莓派 2019 年 5 月之后的系统(早于之前的可不用执行),可能需要进行升级:# project-downloads.drogon.net 已停止服务,请使用下面的 GitHub 方式安装# wget https://project-downloads.drogon.net/wiringpi-latest.deb# sudo dpkg -i wiringpi-latest.debgpio -v# 运行 gpio -v 会出现 2.52 版本,如果没有出现,说明安装出错。#Bullseye 分支系统使用如下命令:git clone https://github.com/WiringPi/WiringPicd WiringPi./buildgpio -v# 运行 gpio -v 会出现 2.60 版本,如果没有出现,说明安装出错。下载程序(已下载可跳过)
wget https://www.waveshare.net/w/upload/2/2d/5inch_e-Paper.zipunzip 5inch_e-Paper.zip -d 5inch_e-Papercd 5inch_e-Paper/RaspberryPi_JetsonNano/备用解压方式
git clone https://github.com/waveshare/e-Paper.gitcd e-Paper/E-paper_Separate_Program/5inch_e-Paper/RaspberryPi_JetsonNano通过 GitHub 下载程序(备用方式,已下载可跳过)
- 目前访问 GitHub 并不是很流畅,建议使用上面的方法从我们官网下载。sudo apt-get install p7zip-full7z x 5inch_e-Paper.zip -O./5inch_e-Papercd 5inch_e-Paper/RaspberryPi_JetsonNano/
- 目前访问 GitHub 并不是很流畅,建议使用上面的方法从我们官网下载。
编译程序(说明:-j4 为使用 4 线程编译,数字可自行修改;)
# 此时在 5inch_e-Paper/RaspberryPi_JetsonNano 位置cd csudo make cleansudo make -j4运行程序
sudo ./epd
运行 python 例程
安装函数库
sudo apt-get updatesudo apt-get install python3-pipsudo apt-get install python3-pilsudo apt-get install python3-numpysudo pip3 install spidev安装函数库(python2)
sudo apt-get updatesudo apt-get install python-pipsudo apt-get install python-pilsudo apt-get install python-numpysudo pip install spidev安装 gpiozero 库(系统默认已安装,如果没有安装请按照以下命令进行安装)
sudo apt-get update# python3sudo apt install python3-gpiozero# python2sudo apt install python-gpiozero下载程序(已下载可跳过)
wget https://www.waveshare.net/w/upload/2/2d/5inch_e-Paper.zipunzip 5inch_e-Paper.zip -d 5inch_e-Papercd 5inch_e-Paper/RaspberryPi_JetsonNano/备用解压方式
sudo apt-get install p7zip-full7z x 5inch_e-Paper.zip -O./5inch_e-Papercd 5inch_e-Paper/RaspberryPi_JetsonNano/通过 GitHub 下载程序(备用方式,已下载可跳过)
- 目前访问 GitHub 并不是很流畅,建议使用上面的方法从我们官网下载。git clone https://github.com/waveshare/e-Paper.gitcd e-Paper/E-paper_Separate_Program/5inch_e-Paper/RaspberryPi_JetsonNano
- 目前访问 GitHub 并不是很流畅,建议使用上面的方法从我们官网下载。
运行程序
# 确保在 5inch_e-Paper/RaspberryPi_JetsonNano/ 位置cd python/examples/python3 epd_5in0_test.py
Arduino 使用说明
硬件连接
- 使用 9PIN 排线连接,请参考下方的引脚对应表格:
- Arduino 连接引脚对应关系
e-Paper Arduino UNO Mega2560 VCC 5V 5V GND GND GND DIN D11 D51 CLK D13 D52 CS D10 D10 DC D9 D9 RST D8 D8 BUSY D7 D7 PWR D6 D6
- Arduino 连接引脚对应关系
安装 IDE
运行程序
- 在资料界面 下载程序,然后解压进入
5inch_e-Paper目录可以看到下面的内容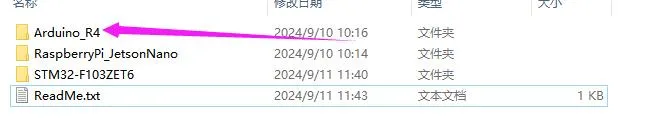
- 打开测试程序:
5inch_e-Paper\Arduino_R4\Arduino_R4.ino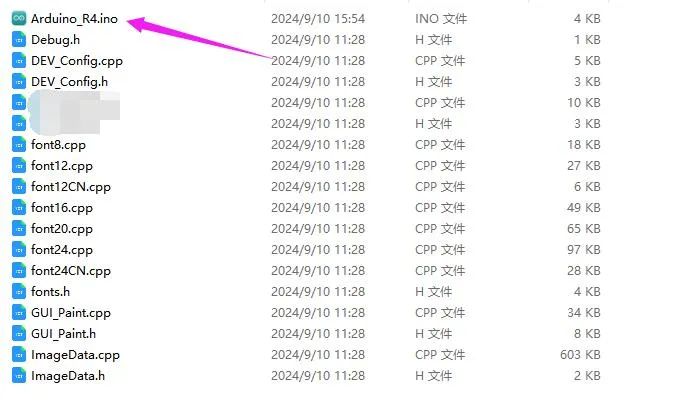
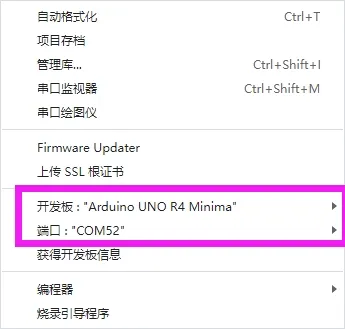
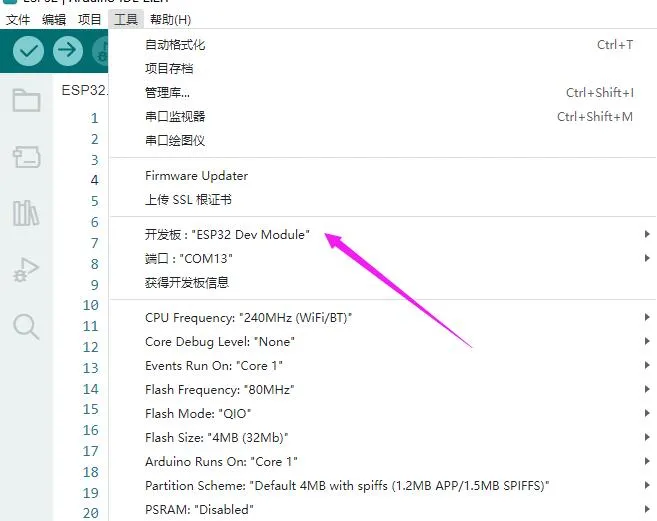
- 在 Arduino IDE 中的工具栏(Tools)选择对应的开发板(Board)和端口(Port)
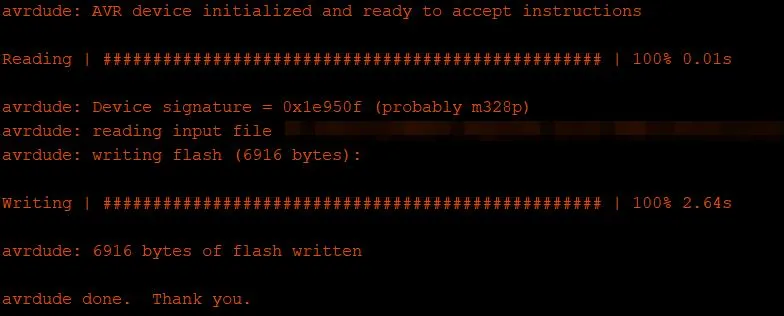
- 最后点击上传即可,上传成功如下(Arduino 1.8.13)
Jetson Nano 使用说明
硬件连接
Jetson Nano 的 40PIN 引脚是兼容树莓派的 40PIN 引脚的,并且提供了一个 Jetson.GPIO 库跟树莓派的 RPI.GPIO 库的 API 是一致的,所以这里连接的序号跟树莓派的是一样的,使用 40PIN 接口时,可以直接将模块插入 Jetson Nano 的 40Pin 排座。
如果是选择用 9PIN 排线连接的话,请参考下方的引脚对应表格:
Jetson nano连接引脚对应关系
e-Paper Jetson Nano Developer Kit BCM2835 编码 Board 物理引脚序号 VCC 3.3V 3.3V GND GND GND DIN 10(SPI0_MOSI) 19 CLK 11(SPI0_SCK) 23 CS 8(SPI0_CS0) 24 DC 25 22 RST 17 11 BUSY 24 18 PWR 18 12
运行 C 语言例程
下载程序(已下载可跳过)
wget https://www.waveshare.net/w/upload/2/2d/5inch_e-Paper.zipunzip 5inch_e-Paper.zip -d 5inch_e-Papercd 5inch_e-Paper/RaspberryPi_JetsonNano/备用解压方式
sudo apt-get install p7zip-full7z x 5inch_e-Paper.zip -O./5inch_e-Papercd 5inch_e-Paper/RaspberryPi_JetsonNano/通过 GitHub 下载程序(备用方式,已下载可跳过)
- 目前访问 GitHub 并不是很流畅,建议使用上面的方法从我们官网下载。git clone https://github.com/waveshare/e-Paper.gitcd e-Paper/E-paper_Separate_Program/5inch_e-Paper/E-RaspberryPi_JetsonNano
- 目前访问 GitHub 并不是很流畅,建议使用上面的方法从我们官网下载。
编译程序(说明:-j4 为使用 4 线程编译,数字可自行修改;)
# 此时在 5inch_e-Paper/RaspberryPi_JetsonNano 位置cd csudo make cleansudo make JETSON -j4运行程序
sudo ./epd
运行 python 例程
安装函数库
sudo apt-get updatesudo apt-get install python3-numpysudo apt-get install python3-pipsudo pip3 install Jetson.GPIO下载程序(已下载可跳过)
wget https://www.waveshare.net/w/upload/2/2d/5inch_e-Paper.zipunzip 5inch_e-Paper.zip -d 5inch_e-Papercd 5inch_e-Paper/RaspberryPi_JetsonNano/备用解压方式
sudo apt-get install p7zip-full7z x 5inch_e-Paper.zip -O./5inch_e-Papercd 5inch_e-Paper/RaspberryPi_JetsonNano/通过 GitHub 下载程序(备用方式,已下载可跳过)
- 目前访问 GitHub 并不是很流畅,建议使用上面的方法从我们官网下载。git clone https://github.com/waveshare/e-Paper.gitcd e-Paper/E-paper_Separate_Program/5inch_e-Paper/E-RaspberryPi_JetsonNano
- 目前访问 GitHub 并不是很流畅,建议使用上面的方法从我们官网下载。
运行程序
# 确保在 5inch_e-Paper/RaspberryPi_JetsonNano/ 位置cd python/examples/python3 epd_5in0_test.py
TM32 使用说明
硬件连接
使用 9PIN 排线连接,请参考下方的引脚对应表格:
STM32 连接引脚对应关系
| e-Paper | STM32 |
|---|---|
| VCC | 3.3V |
| GND | GND |
| DIN | PA7 |
| CLK | PA5 |
| CS | PA4 |
| DC | PA2 |
| RST | PA1 |
| BUSY | PA3 |
| PWR | PA6 |
运行程序
- 点击 下载 程序,然后解压进入
5inch_e-Paper目录可以看到下面的内容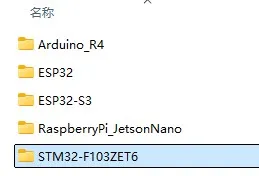
- 使用 Keil 打开 5inch_e-Paper\STM32-F103ZET6\MDK-ARM 目录下的 epd-demo.uvprojx
- 打开 Keil 的编译工具栏(一般情况已经打开了)
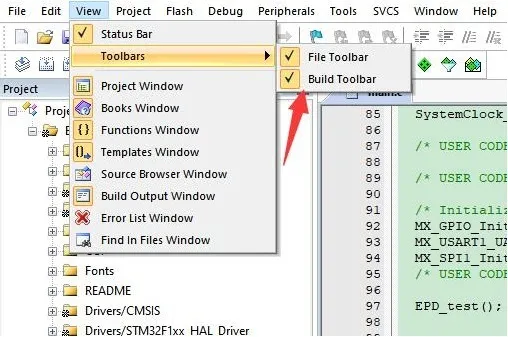
- 点击编译。

- 确保已连接合适的烧录器,然后点击下载(LOAD)将程序下载到单片机中
ESP32 使用说明
硬件连接
ESP32 连接引脚对应关系
| e-Paper | ESP32 | ESP32-S3 |
|---|---|---|
| VCC | 3.3V | 3.3V |
| GND | GND | GND |
| DIN | IO14 | IO11 |
| CLK | IO13 | IO12 |
| CS | IO15 | IO10 |
| DC | IO27 | IO13 |
| RST | IO26 | IO14 |
| BUSY | IO25 | IO4 |
| PWR | IO33 | IO5 |
环境配置
在线安装需要使用翻墙软件,离线安装则无需使用
运行程序
- 在资料界面 下载程序,然后解压进入
5inch_e_Paper目录可以看到下面的内容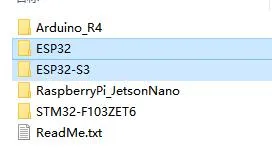
- 打开测试程序:
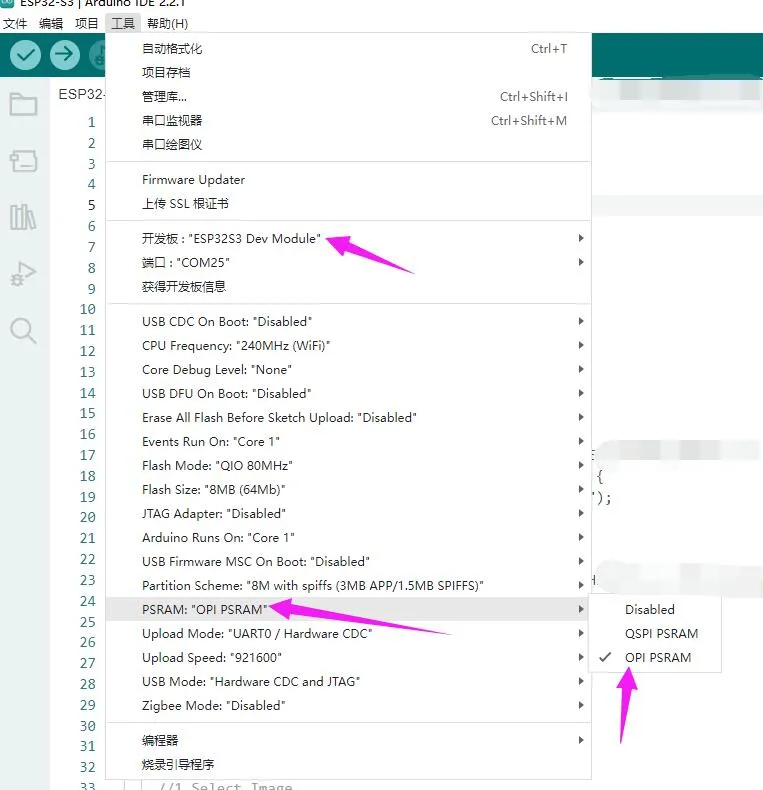
5inch_e-Paper\ESP32\ESP32.ino或者5inch_e-Paper\ESP32\ESP32-S3.ino

- 在 Arduino IDE 中的工具栏(Tools)选择对应的开发板(Board)和端口(Port)
- 如果使用是是 ESP32-S3 之类的带 PSRAM 的核心,请开启 PSRAM
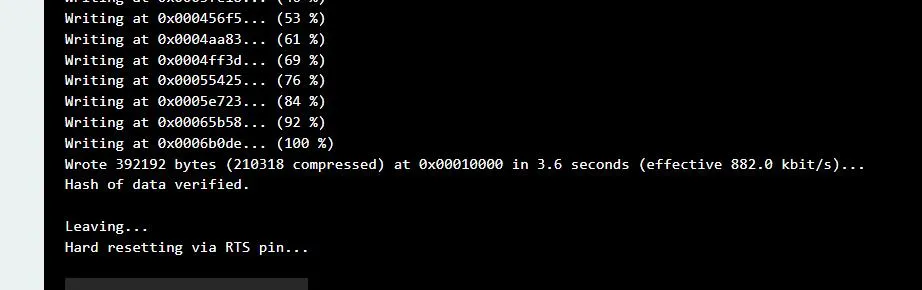
- 最后点击上传即可,上传成功如下(Arduino 2.2.1)
相关资料
1. 硬件资料
驱动板设计文件
2. 技术手册
3. 示例程序
4. 软件工具
5. 其他资料链接
开发资料:
相关链接:
6. 演示视频
技术支持
周一-周五(9:30-6:30)周六(9:30-5:30)
手机:13434470212
邮箱:services04@spotpear.cn
QQ:202004841