LCD1602 I2C Module 使用教程
产品介绍
产品简介
- 我们的 LCD1602 模块是通过I2C协议进行控制,适用于树莓派、树莓派 Pico、ESP32、Arduino和Jetson nano等平台。相比传统的并行接口,I2C大大简化了接线,并节省了GPIO引脚,非常适合嵌入式项目和快速原型设计。
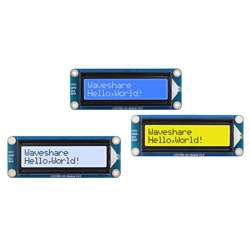
- 该显示屏有三种可选背光颜色:蓝色、绿色和灰色,用户可以根据需求选择合适的背景色来提升显示效果或匹配项目主题。
产品特性
- I2C接口,只需两根线即可直接控制,方便接入多种控制板
- 最多可以显示16 X 2个字符,支持屏幕滚动、光标移动等功能
- 外观精美小巧,做工精致美观,采用高集成度设计,性能稳定,做工精细,尺寸小巧,整体尺寸87 * 32* 13 mm
- 板载AiP31068L LCD驱动芯片跟SN3193 背光驱动芯片
- 提供完善的配套资料手册(用户使用手册/示例程序)
产品参数
| 参数名称 | 参数 |
| 工作电压 | 3.3V/5V |
| 工作电流 | 5V:26mA |
| 3.3V:13mA | |
| 通信接口 | I2C |
| I2C地址 | LCD:0x7C |
| LED:0x6B | |
| 屏幕类型 | 液晶屏 |
| 控制芯片 | LCD:AiP31068L |
| LED:SN3193 | |
| 产品尺寸 | 87.0 x 32.0 x 13.0 mm |
接口说明
| 功能引脚 | 描述 |
| VCC | 3.3V/5V 电源正 |
| GND | 电源地 |
| SCL | I2C时钟线 |
| SDA | I2C数据线 |
通信协议

使用说明
- LCD1602 I2C Module 目前提供了5个主控的示例,其中C跟Python都有,可根据项目需求和个人习惯选择适合的示例参考
树莓派示例
- 准备好能正常启动的树莓派,如果没有启动,请参考官方开机教程
- 进入系统后,运行下面的命令,去打开I2C设备:
sudo raspi-config nonint do_i2c 0
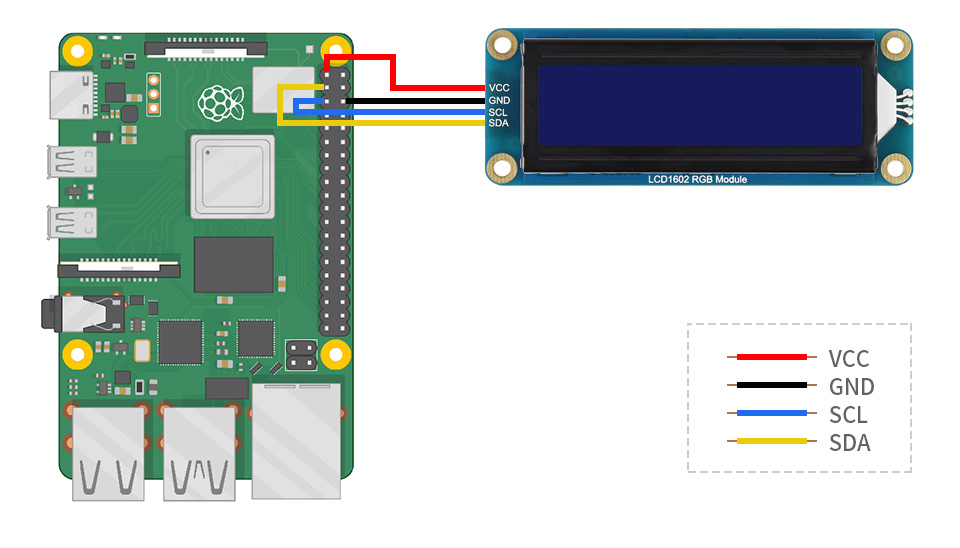
硬件连接
连接树莓派的时候,选择用4PIN排线连接,请参考下方的引脚对应表格
使用的是排针或者PH2.0 4PIN接口,需要对照以下表格连线
| LCD | Raspberry Pi | |
| BCM2835编码 | Board物理引脚序号 | |
| VCC | 3.3V | 3.3V |
| GND | GND | GND |
| SCL | SCL.1 | 5 |
| SDA | SDA.1 | 3 |
以LCD1602 Module使用的是PH2.0 4PIN接口为例,对照上述表格连接在树莓派上即可: (请按照引脚定义表格连接,图中排线颜色仅供参考,以实际颜色为准。)
使用示例
C
【安装库并下载程序】
- wiringpi
cd ~
git clone https://github.com/WiringPi/WiringPi.git
cd WiringPi/
./build debian
mv debian-template/wiringpi-3.0-1.deb .
sudo apt install ./wiringpi_3.10_arm64.deb
- lgpio
cd ~
wget https://www.waveshare.net/w/upload/3/3c/Lg-master.zip
unzip Lg-master.zip
cd lg-master
make
sudo make install
- 下载程序并解压编译
cd ~
wget https://files.waveshare.net/wiki/LCD1602%20I2C%20Module/LCD1602_I2C_Module_Demo.zip
unzip LCD1602_I2C_Module_Demo.zip
cd ~/LCD1602_I2C_Module_code/Raspberry/c
sudo make
【运行 Character display 示例】
- Character display
cd ~/LCD1602_I2C_Module_code/Raspberry/c
sudo ./main 1
【运行 Custom char 示例】
- Custom char
cd ~/LCD1602_I2C_Module_code/Raspberry/c
sudo ./main 2
【运行 Direction control 示例】
- Direction control
cd ~/LCD1602_I2C_Module_code/Raspberry/c
sudo ./main 3
【运行 Display time 示例】
- Display time
cd ~/LCD1602_I2C_Module_code/Raspberry/c
sudo ./main 4
【运行 Scroll display 示例】
- Scroll display
cd ~/LCD1602_I2C_Module_code/Raspberry/c
sudo ./main 5
【makefile脚本说明】
我们做了两个库的使用,Wiringpi跟Lgpio,开发者可以从Makefile中,选择任意一个即可
USELIB = USE_WIRINGPI_LIB
# USELIB = USE_DEV_LIB
可以通过注释/取消注释这些行,切换使用不同的库
Python
【安装库并下载程序】
- python
sudo apt install python3-smbus
- 下载程序并解压编译
cd ~
wget https://files.waveshare.net/wiki/LCD1602%20I2C%20Module/LCD1602_I2C_Module_Demo.zip
unzip LCD1602_I2C_Module_Demo.zip
cd ~/LCD1602_I2C_Module_code/Raspberry/python/examples
【运行 Character display 示例】
- Character display
sudo python Character_display.py
【运行 Custom char 示例】
- Custom char
sudo python Custom_char.py
【运行 Direction control 示例】
- Direction control
sudo python Direction_control.py
【运行 Display time 示例】
- Display time
sudo python Display_time.py
【运行 Scroll display 示例】
- Scroll display
sudo python Scroll_display.py
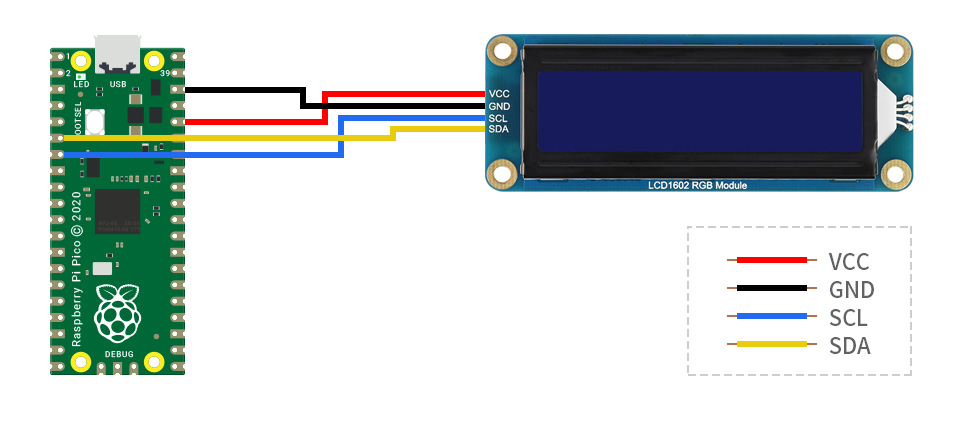
Pico示例
环境设置
- 环境设置请点击查阅
硬件连接
| 模块接口 | Pico 功能引脚 |
| VCC | 3.3V |
| GND | GND |
| SCL | GP5 |
| SDA | GP4 |
实物连接图如下
使用示例
- 下载示例程序,并解压
- 下面的使用方式都是保存开发环境正常的情况下,才能实现。
C
- 进入到*\LCD1602_I2C_Module_Demo\Pico\c的文件夹中,使用vs code打开全部文件,等待环境加载工具
- 加载完成后开始编译运行示例
【主函数说明】
- 主函数中有五个示例,可以通过注释/取消注释这些行,切换使用不同的示例
【程序烧录】
- 将Pico设备进入到boot盘模式,方式为:摁住boot按键连接电脑,再松开boot按键
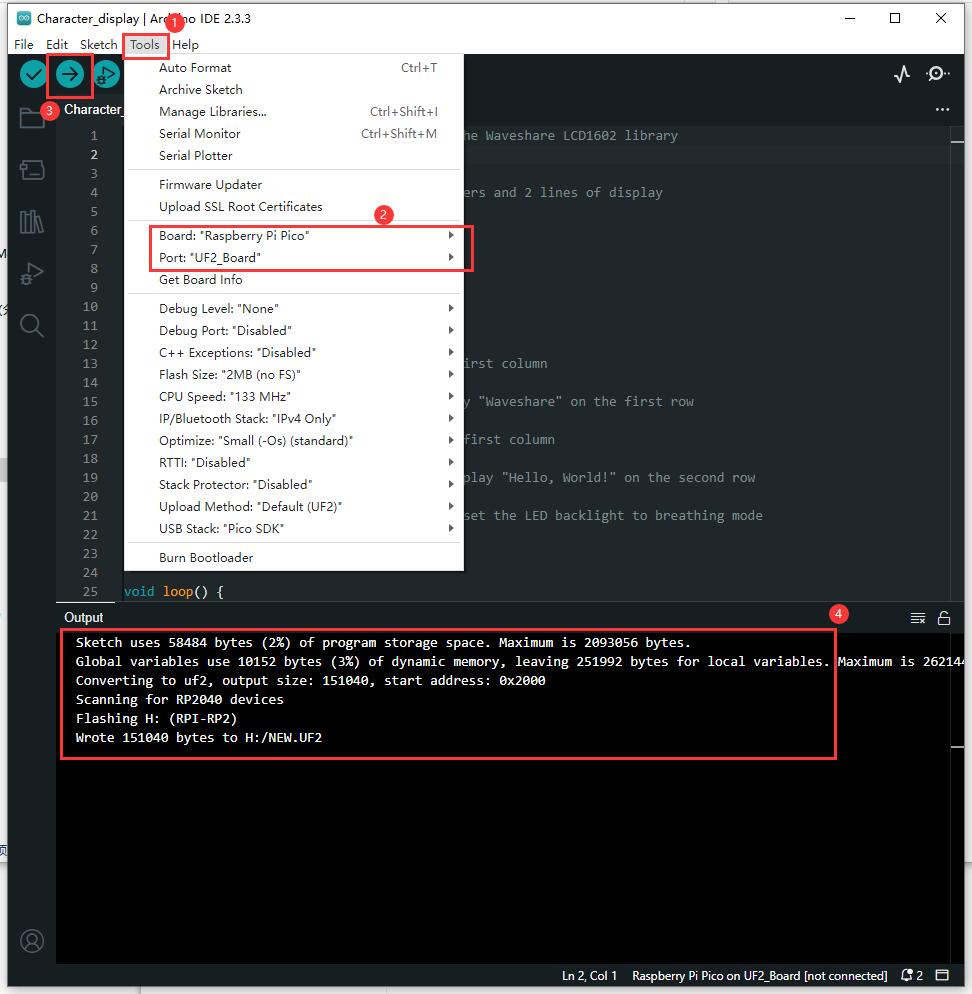
- 编译、烧录和运行如下图:
- 点击 ① 是开始编译
- 出现 ② 则编译成功
- 点击 ③ 进行烧录(如果没有进入boot盘,在烧录时会出现错误:No accessible RP-series devices in BOOTSEL mode were found.)

Micropython
【烧录Micropython固件】
- 将Pico设备进入到boot盘模式,方式为:摁住boot按键连接电脑,再松开boot按键
- 进入到*\LCD1602_I2C_Module_Demo\Pico\python的文件夹中,将对应设备的uf2固件复制到boot盘中
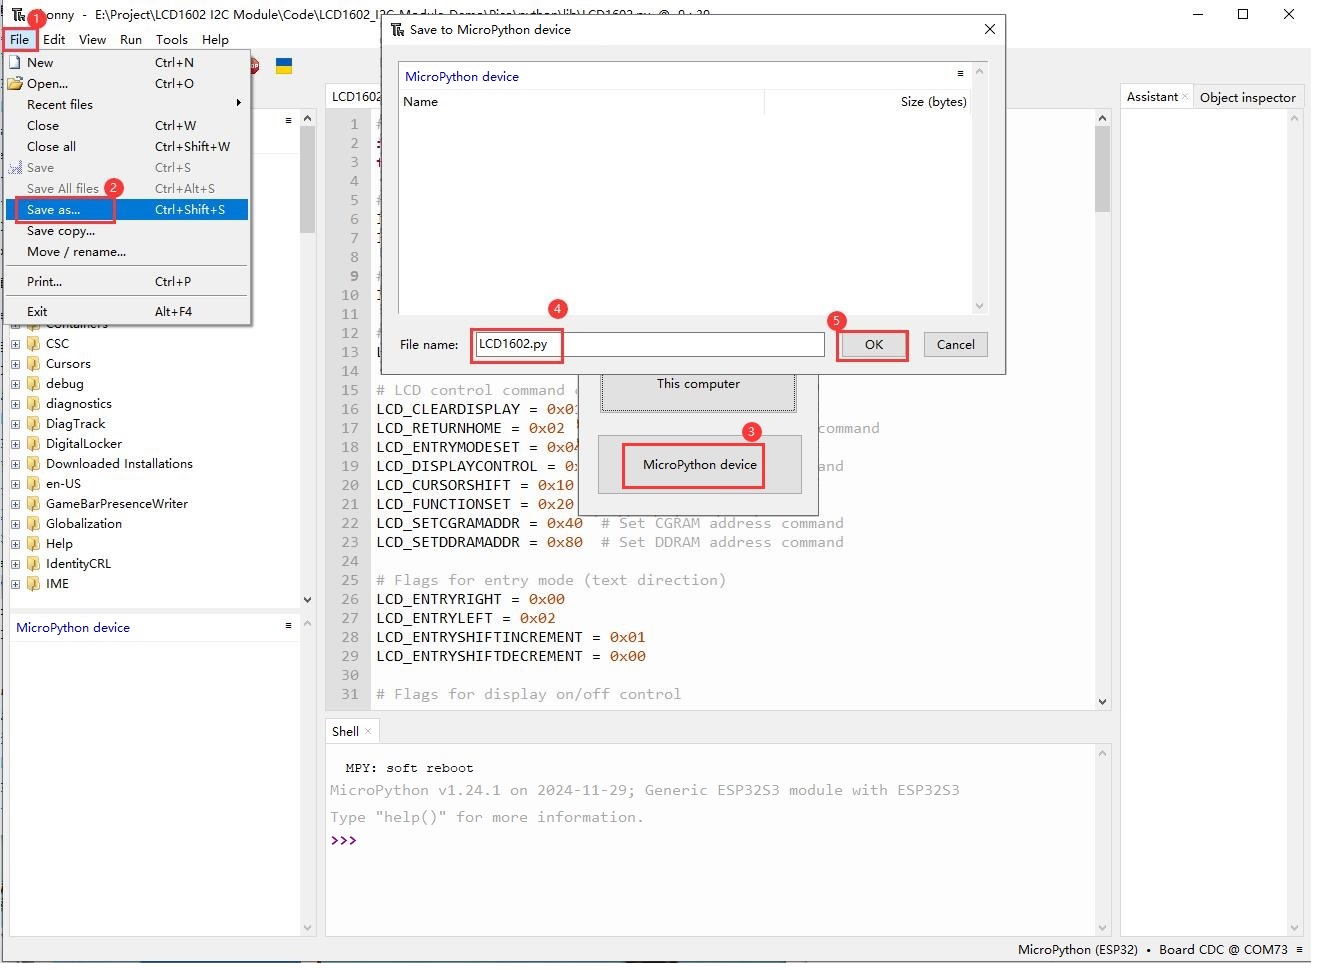
【保存驱动库】
- 打开Thonny,连接pico设备
- 打开*\LCD1602_I2C_Module_Demo\Pico\python\lib文件中的LCD1602.py文件,并另存为pico中
- 具体步骤如下图:

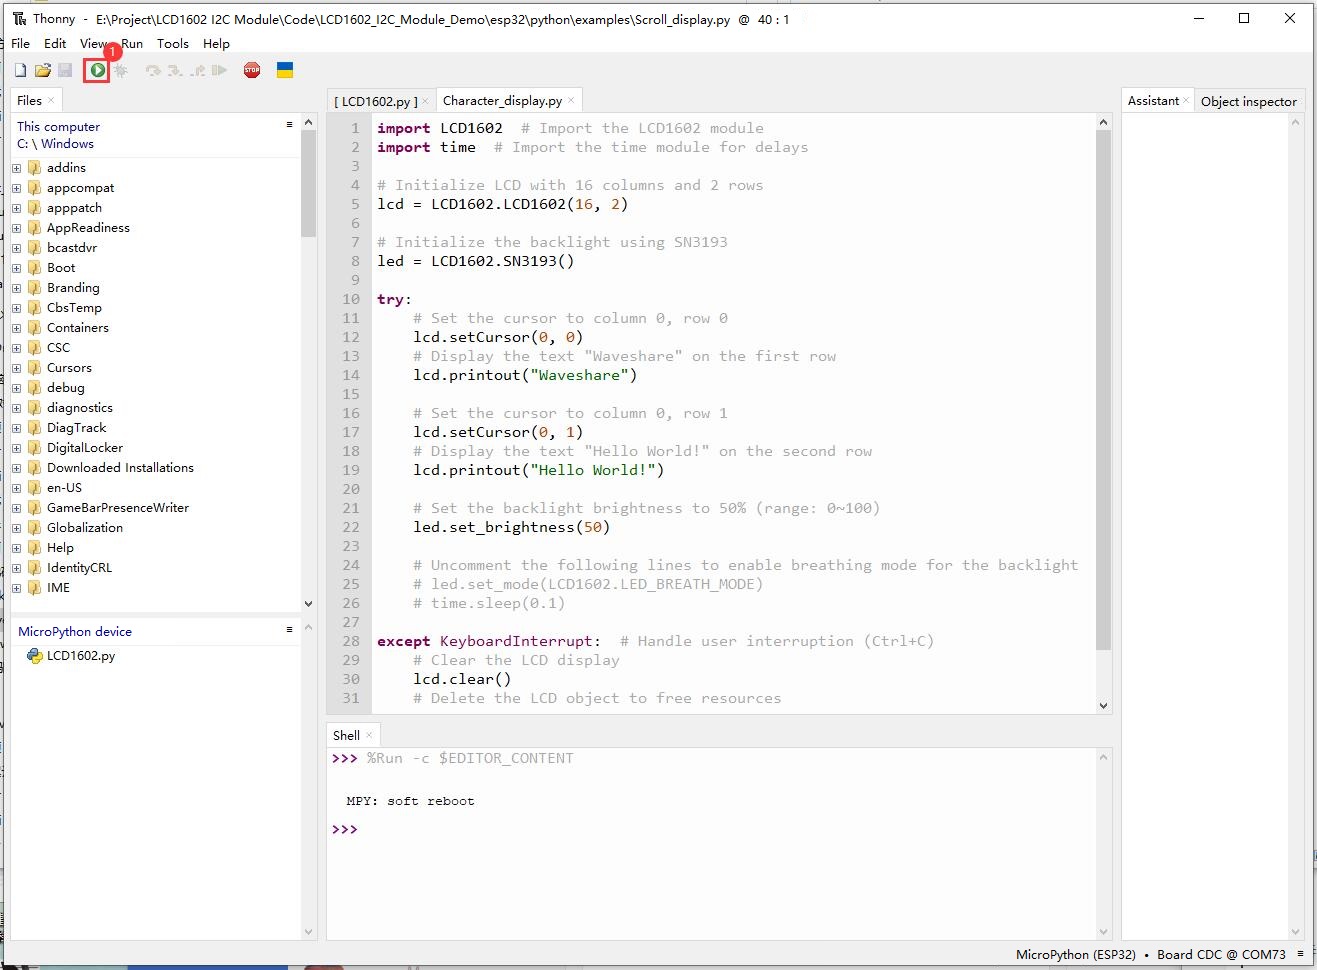
【运行示例】
- 使用thonny打开*\LCD1602_I2C_Module_Demo\esp32\python\examples文件中的示例文件,按照下图运行即可:
Arduino-Pico
【安装库】
- 进入到*\LCD1602_I2C_Module_Demo\Pico\arduino的文件夹中,将里面的文件复制到项目文件夹的 libraries 文件夹下,若还是不太清楚,可以参考此链接
【运行示例】
- 将Pico设备进入到boot盘模式,方式为:摁住boot按键连接电脑,再松开boot按键
- 使用 Arduino IDE 打开*\LCD1602_I2C_Module_Demo\Pico\arduino\Waveshare_LCD1602\examples文件中的示例文件
- 具体步骤如下图:
- ①跟②是选择对应的开发板型号跟端口
- ③编译烧录
- ④烧录完成
Arduino示例
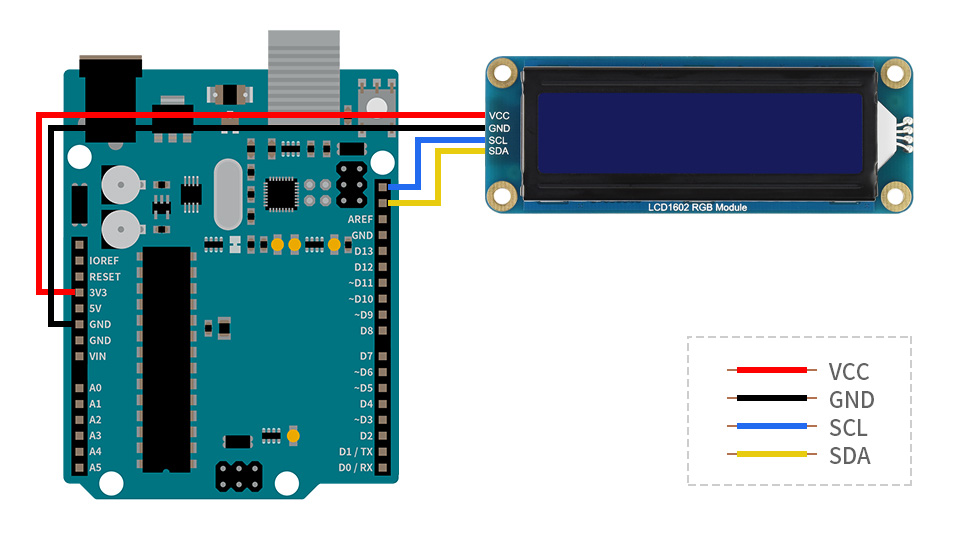
硬件连接
| 模块接口 | Arduino 功能引脚 |
| VCC | 5V/3.3V |
| GND | GND |
| SCL | SCL |
| SDA | SDA |
实物连接图
使用示例
【安装库】
- 进入到*\LCD1602_I2C_Module_Demo\Arduino的文件夹中,将里面的文件复制到项目文件夹的 libraries 文件夹下,若还是不太清楚,可以参考此链接
【运行示例】
- 使用 Arduino IDE 打开*\LCD1602_I2C_Module_Demo\Arduino\Waveshare_LCD1602\examples文件中的示例文件
- 具体步骤如下图:
- ①跟②是选择对应的开发板型号跟端口
- ③编译烧录
- ④烧录完成
ESP32示例
环境搭建
- Arduino环境搭建参考:点击查阅
- Micropython环境搭建参考:点击查阅
- 烧录Micropython的固件需要使用对应ESP32开发板的,我这边用的ESP32S3的,并存放在此处:*\LCD1602_I2C_Module_Demo\esp32\python\bin
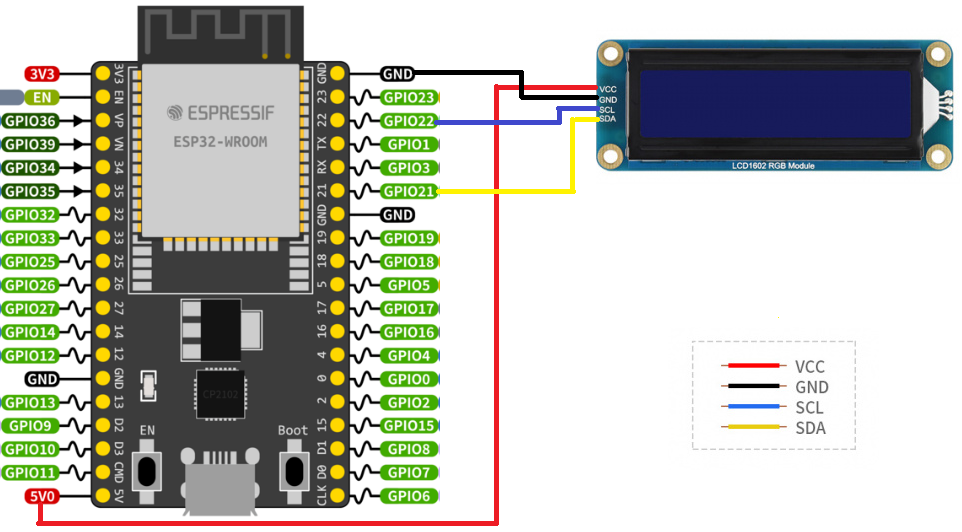
硬件连接
连接ESP32的时候,选择用4PIN排线连接,请参考下方的引脚对应表格
使用的是排针或者PH2.0 4PIN接口,需要对照以下表格连线
| LCD | ESP32 | |
| 引脚编号 | ||
| VCC | 5V/3.3V | |
| GND | GND | |
| SCL | GPIO5 | |
| SDA | GPIO4 | |
以LCD1602 Module使用的是PH2.0 4PIN接口为例,对照上述表格连接在ESP32上即可: (请按照引脚定义表格连接,图中排线颜色仅供参考,以实际颜色为准。)
接入ESP32 如下图。
使用示例
Arduino-ESP32
【安装库】
- 进入到*\LCD1602_I2C_Module_Demo\esp32\arduino的文件夹中,将里面的文件复制到项目文件夹的 libraries 文件夹下,若还是不太清楚,可以参考此链接
【运行示例】
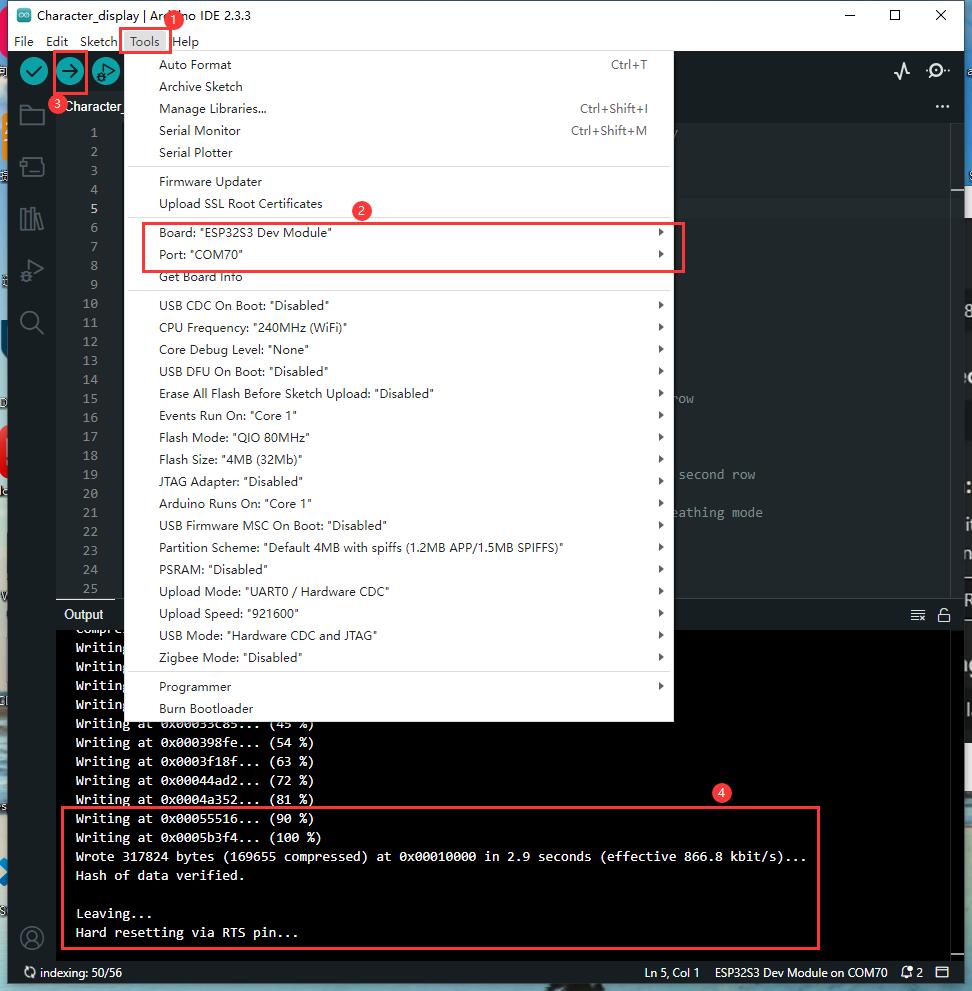
- 使用 Arduino IDE 打开*\LCD1602_I2C_Module_Demo\esp32\arduino\Waveshare_LCD1602\examples文件中的示例文件
- 具体步骤如下图:
- ①跟②是选择对应的开发板型号跟端口
- ③编译烧录
- ④烧录完成
Micropython
【烧录Micropython固件】
- 从Micropython官网中下载对应固件
- 如果用的ESP32S3,可以直接用我们提供的固件,路径:
*\LCD1602_I2C_Module_Demo\esp32\python\bin
- 烧录固件教程,详见:Flash固件的烧录与擦除教程
- 注意:下载地址是0x00
【保存驱动库】
- 打开Thonny,连接esp32设备
- 打开*\LCD1602_I2C_Module_Demo\Pico\python\lib文件中的LCD1602.py文件,并另存为esp32中
- 具体步骤如下图:
【运行示例】
- 使用thonny打开*\LCD1602_I2C_Module_Demo\Pico\python\examples文件中的示例文件,按照下图运行即可:
Jetson nano使用
- 准备好能正常启动的jetson nano,如果没有启动,请参考开机教程
硬件连接
连接Jetson nano的时候,选择用4PIN排线连接,请参考下方的引脚对应表格
使用的是排针或者PH2.0 4PIN接口,需要对照以下表格连线
| LCD | Jetson nano | |
| Board物理引脚序号 | ||
| VCC | 3.3V | |
| GND | GND | |
| SCL | 5 | |
| SDA | 3 | |
以LCD1602 Module使用的是PH2.0 4PIN接口为例,对照上述表格连接在Jetson nano上即可: (请按照引脚定义表格连接,图中排线颜色仅供参考,以实际颜色为准。)
接入Jetson nano 如下图。

使用示例
【安装库并下载程序】
- python3
sudo apt install python3-smbus
- python2
sudo apt install python-smbus
- 下载程序并解压编译
cd ~
wget https://files.waveshare.net/wiki/LCD1602%20I2C%20Module/LCD1602_I2C_Module_Demo.zip
unzip LCD1602_I2C_Module_Demo.zip
cd ~/LCD1602_I2C_Module_code/Jetson Nano/python/examples
【运行 Character display 示例】
- Character display
sudo python Character_display.py
【运行 Custom char 示例】
- Custom char
sudo python Custom_char.py
【运行 Direction control 示例】
- Direction control
sudo python Direction_control.py
【运行 Display time 示例】
- Display time
sudo python Display_time.py
【运行 Scroll display 示例】
- Scroll display
sudo python Scroll_display.py
API 介绍
【C/C++】
API介绍
 /**
  *  @brief 液晶屏初始化
  *  @param cols 列数量(暂时无功能)
  *  @param rows 行数量
  */
 void LCD1602_init(uint8_t cols, uint8_t rows);
 /**
  *  @brief 打开显示
  */
 void LCD1602_display();
 /**
  *  @brief send command
  *  @param value 发送的命令
  */
 void LCD1602_command(uint8_t value);
 /**
  *  @brief 设置光标位置
  *  @param col 列数 可选范围 0-15 最大为39,需要移动才能观察到大于15的字符
  *  @param row 行数 可选范围 0-1,0代表了第一行,1代表了第二行
  */
 void LCD1602_setCursor(uint8_t col, uint8_t row);
 /**
  *  @brief 清除显示并将光标回到初始位置(0位置)
  */
 void LCD1602_clear();
 /**
  *  @brief 写入数据
  *  @param value 写入的数据
  */
 void LCD1602_data(uint8_t value);
 /**
  *  @brief 显示字符串
  *  @param str 显示的字符串
  */
 void LCD1602_send_string(const char *str);
 /**
  *  @brief 关闭下划线光标
  */
 void LCD1602_noCursor();
 /**
  *  @brief 打开下划线光标
  */
 void LCD1602_cursor();
 /**
  *  @brief 向左滚动显示
  */
 void LCD1602_scrollDisplayLeft();
 /**
  *  @brief 向右滚动显示
  */
 void LCD1602_scrollDisplayRight();
 /**
  *  @brief 此函数用于从左到右流动的文本
  */
 void LCD1602_leftToRight();
 /**
  *  @brief 此函数用于从右到左流动的文本
  */
 void LCD1602_rightToLeft();
 /**
  *  @brief  这将使文本从显示光标处“左对齐”
  */
 void LCD1602_noAutoscroll();
 /**
  *  @brief 这将使文本从显示光标处“右对齐”
  */
 void LCD1602_autoscroll();
 /**
  *  @brief 允许我们将前8个CGRAM位置填充自定义字符
  *  @param location 代替字符 范围(0-7)
  *  @param charmap  字符数组 大小8个字节
  */
 void LCD1602_createChar(uint8_t location, uint8_t charmap[]);
 /**
  *  @brief 背光芯片初始化
  */
 void LCD1602_led_init();
 /**
  *  @brief 设置背光亮度
  *  @param value  背光强度值   范围(0-100)
  */
 void LCD1602_set_brightness(uint8_t value);
 /**
  *  @brief 设置背光模式
  *  @param mode  0x00为正常模式,0x20为呼吸模式
  */
 void LCD1602_set_led_mode(uint8_t mode);
【Python】
API介绍
 def command(self, cmd)

     @brief send command
     @param cmd 发送的命令
 def data(self,data)

     @brief write character
     @param data 写入的数据
 def setCursor(self,col,row)

     @brief 设置光标位置
     @param col 列数 可选范围 0-39
     @param row 行数 可选范围 0-1,0代表了第一行,1代表了第二行
 def clear(self)

     @brief 清除显示并将光标回到初始位置(0位置)
 def printout(self,arg)

     @brief 向液晶屏输出显示
     @param arg 输出的数据
def createChar(self, location, charmap)

     @brief 允许我们将前8个CGRAM位置填充自定义字符
     @param location  代替字符 范围(0-7)
     @param charmap 字符列表 大小8个字节
 def scrollDisplayLeft(self)

     @brief 向左滚动显示
 def scrollDisplayRight(self)

     @brief 向右滚动显示
 def cursor(self)

     @brief 打开下划线光标
 def nocursor(self)

     @brief 关闭下划线光标
 def leftToRight(self)

     @brief 此函数用于从左到右流动的文本
 def rightToLeft(self)

     @brief 此函数用于从右到左流动的文本
 def autoscroll(self)

     @brief 这将使文本从显示光标处“右对齐”
 def noautoscroll(self)

     @brief 这将使文本从显示光标处“左对齐”
 def display(self)

     @brief 打开显示
def set_brightness(self, Value)

     @brief 设置背光亮度
     @param Value 范围(0-100)
def set_mode(self, Mode)

     @brief 背光模式
     @param Mode 正常模式(0x00),呼吸模式(0x20)
FAQ
问题:使用python示例程序时,为什么只显示第二行而第一行显示不了?
可能是python固件不兼容的问题,可以使用我们示例程序给出的固件版本。
问题:LCD1602 的SDA和SCL有上拉电阻么?
有的。
问题:LCD1602 的工作电流大概多少?
一般在30mA左右。
技术支持
周一-周五(9:30-6:30)周六(9:30-5:30)
手机:13434470212
邮箱:services04@spotpear.cn
QQ:202004841