13.3寸智能魔镜显示屏使用教程
产品概述
本产品是13.3寸智能魔镜,内置树莓派3A+,能显示新闻、天气、时间,支持智能语音对话,1920x1080超清分辨率,带钢化玻璃电容触摸面板。
产品特点
- 内置树莓派3A+主控,64位1.4GHz四核,双频WIFI,蓝牙4.2
- IPS屏,1920×1080超清分辨率
- 单向透视镜面,能显示新闻、天气、时间
- 内置黑磁高保真喇叭,优质MEMS硅麦克风,带3.5mm音频接口
- 支持中英文语音对话,搭载Snowboy语音唤醒,科大讯飞,谷歌助手
- 钢化玻璃电容触摸面板,最高支持10点触摸,硬度达6H
- 支持通用的挂壁架,背面有75×75mm的挂壁固定孔(M4螺丝孔)
- 自带75°倾斜角度支架
如何使用
您可以通过两种方法使用 Magic Mirros:方法一,使用预配置的镜像。方法二,在树莓派原始镜像上配置环境运行程序。
新手或者首次安装推荐安装预配置的镜像,预配置镜像已安装需要的库和驱动,程序开机自动运行。
方法一,使用预配置的镜像
- 1) 这里提供预配置的镜像,解压并把镜像写入到TF卡中(打开Win32DiskImager.exe软件,选择.img文件,点击「write」烧写镜像)。
- Pi2/Pi3/Pi3+启动镜像------------提取码:qao7
- 2) 如果没有连接网线则将TF卡连接到电脑添加自动连接WiFi文件。在根目录下wpa_supplicant.conf文件并添加如下代码,其中your_real_wifi_ssid和your_real_password替换为实际的WiFi账号和密码。如果是国内还需要将country=US改为country=CN
- ctrl_interface=DIR=/var/run/wpa_supplicant GROUP=netdev
- update_config=1
- country=US
- network={
- ssid="your_real_wifi_ssid"
- psk="your_real_password"
- }
- 3) 烧写完成后,把卡插入树莓派上,打开电源开关。正常就会启动系统了。
- 4) 系统默认采用英文显示,国内如果没有科学上网则不能正常显示新闻,需要打开终端运行如下代码修改中文配置。
- cd ~/MagicMirror/modules/MMM-VoiceAssistant/config
- cp config/config.js.cn ~/MagicMirror/config/config.js #显示中文
- #cp config/config.js.en ~/MagicMirror/config/config.js #显示英文
- 4) 魔镜支持中英文语音对话,中文采用科大讯飞的AIUI ,英文采用Google Assistant Service,搭载Snowboy唤醒词检测引擎。
- 程序默认有两个唤醒词"smart_mirror"和"snowboy"。使用“smart_mirror”唤醒会识别为中文调用科大讯飞API。使用“snowboy”唤醒会识别为英文调用Google Assistant API。
- snowboy:https://snowboy.kitt.ai/
- 科大讯飞:https://www.xfyun.cn/
- Google Assistant:https://developers.google.com/assistant/sdk/guides/service/python
注意:Google助手服务需要科学上网,否则不会有响应。
注意:镜像中唤醒词采用的是公有模型,理论上对所有人都有效,但是实际可能会不能唤醒或者比较难唤醒。用户需要到snowboy官方注册账号训练自己的模型或者更改其他唤醒词。详细操作请看下面注意事项
方法二,在树莓派原始镜像上配置环境运行程序(非专业人士可以跳过)
1.安装树莓派镜像
- 1)将树莓派镜像写入到TF卡中,在TF卡更目录下新建一个名为SSH的空白文件开启SSH,编辑TF卡根目录下的config.txt文件设置屏幕分辨率。在config.txt文件末尾添加:
- hdmi_group=2
- hdmi_mode=82
- hdmi_cvt 1920 1080 60 6 0 0 0
- 必须确保等号两边没有空格。
- 2) 保存并将TF卡插入树莓派, Magic Mirror接上网线,树莓派上电后正常等待几秒后可正常显示。
- 3)树莓派正常启动后可以通过鼠标键盘操作,也可以通过SSH或VNC操作。
2.安装WM8960声卡驱动
- 请勿切换软件源,切换了软件源可能会安装失败,需要重新烧录镜像
- git clone https://github.com/waveshare/WM8960-Audio-HAT
- cd WM8960-Audio-HAT
- #需要等待一定的时间
- sudo ./install.sh
- sudo reboot
- 编辑/boot/config.txt,注释掉默认音频
- #dtparam=audio=on
- 重启后运行如下命令看下驱动是否加载成功。
- pi@raspberrypi:~ $ sudo dkms status
- wm8960-soundcard, 1.0, 4.19.58-v7l+, armv7l: installed
- 检测声卡
- 检查播放:aplay -l
- pi@raspberrypi:~ $ aplay -l
- **** List of PLAYBACK Hardware Devices ****
- card 0: wm8960soundcard [wm8960-soundcard], device 0: bcm2835-i2s-wm8960-hifi wm8960-hifi-0 []
- Subdevices: 1/1
- Subdevice #0: subdevice #0
- 检查录音:arecord -l
- pi@raspberrypi:~ $ arecord -l
- **** List of CAPTURE Hardware Devices ****
- card 0: wm8960soundcard [wm8960-soundcard], device 0: bcm2835-i2s-wm8960-hifi wm8960-hifi-0 []
- Subdevices: 1/1
- Subdevice #0: subdevice #0
3.安装Magic Mirror
- curl -sL https://deb.nodesource.com/setup_10.x | sudo -E bash -
- sudo apt install -y nodejs
- git clone https://github.com/MichMich/MagicMirror
- cd MagicMirror/
- npm install
- 安装成功后运行如下命令显示
- DISPLAY=:0 npm start
- 屏幕显示如图

- 添加MMM-VoiceAssistant模块
- cd ~/MagicMirror/modules
- git clone https://github.com/waveshare/MMM-VoiceAssistant.git
- cd MMM-VoiceAssistant
- cp config/config.js.en ~/MagicMirror/config/config.js #显示英文
- #cp config/config.js.cn ~/MagicMirror/config/config.js #显示中文
- cd ~/MagicMirror
- DISPLAY=:0 npm start
- 屏幕显示如图
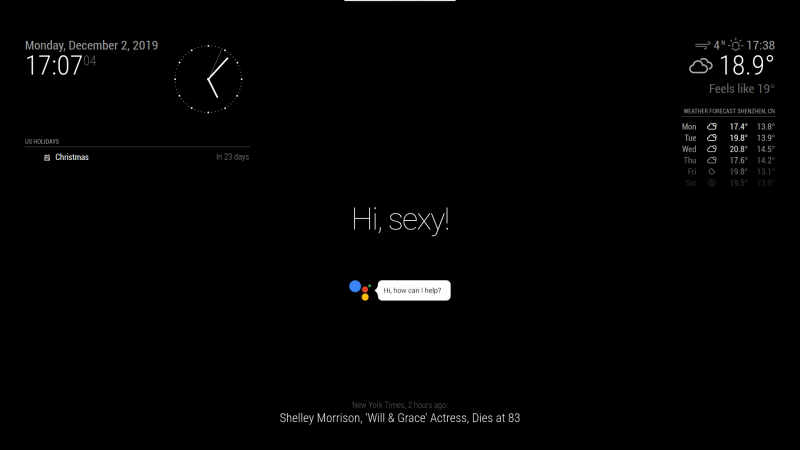
4.安装Python3虚拟环境
- sudo apt-get update
- sudo apt-get install python3-dev python3-venv
- python3 -m venv env
- env/bin/python -m pip install --upgrade pip setuptools wheel
- source env/bin/activate
- 注意:之后的所有操作都是在虚拟环境中进行,重新打开终端需运行如下命令进入到虚拟环境中。
- source ~/env/bin/activate
5.snowboy 安装
- 安装依赖库
- sudo apt-get install swig
- sudo apt-get install libatlas-base-dev
- sudo apt-get install portaudio19-dev
- sudo apt-get install flac
- pip3 install PyAudio
- pip3 install SpeechRecognition
- 下载编译snowboy
- git clone https://github.com/Kitt-AI/snowboy.git
- cd snowboy/swig/Python3
- make
- cd ../../examples/Python3
- 修改snowboydecoder.py文件,将from . import snowboydetect 改为 import snowboydetect,去掉 from .
- 测试snowboy唤醒
- cd ~/snowboy/examples/Python3
- python3 demo.py resources/models/smart_mirror.umdl
- 说smart_mirror,如果有检测到则会显示类似这样的信息,同时会响ding的一声
- INFO:snowboy:Keyword 1 detected at time: 2019-12-03 11:30:16
6.Google Assistant Service 安装
注意:在中国,无法直接使用Google的服务。需要科学上网,必须搭建可以访问google的路由器,然后树莓派连接到路由器。 注意:自2019年6月28日起,不再支持Python的Google Assistant Library 。只能用 Google Assistant Service。
- 在主目录(/home/pi)中新建 .asoundrc 文件,确保Google Assistant可以使用正确的麦克风和扬声器。
- nano .asoundrc
- 新建 .asoundrc文件,将以下配置添加到文件中保存。
- pcm.!default {
- type asym
- capture.pcm "mic"
- playback.pcm "speaker"
- }
- pcm.mic {
- type plug
- slave {
- pcm "hw:0,0"
- }
- }
- pcm.speaker {
- type plug
- slave {
- pcm "hw:0,0"
- }
- }
在开始使用Google Assistant之前,需要将Google Assistant Service 安装到树莓派中。以下是Google官方指导的链接。
https://developers.google.com/assistant/sdk/guides/service/python
请根据指南第三步,配置开发人员项目和配置账户,并创建一个OAuth Client ID JSON文件。 不要忘记将JSON文件复制到您的Raspberry Pi。
请根据指南第四步,注册设备模型。
安装Google Assistant SDK
- (env) $ sudo apt-get install portaudio19-dev libffi-dev libssl-dev
- (env) $ python -m pip install --upgrade google-assistant-sdk[samples]
授权Google Assistant SDK 安装或更新授权工具
- (env) $ python -m pip install --upgrade google-auth-oauthlib[tool]
生成凭据以能够运行示例代码和工具。引用您在上一步中下载的JSON文件 ;您可能需要将其复制到设备。不要重命名该文件。
- (env) $ google-oauthlib-tool --scope https://www.googleapis.com/auth/assistant-sdk-prototype \
- --save --headless --client-secrets /path/to/client_secret_ client-id .json
可以在终端中看到一个URL:
- Please visit this URL to authorize this application: https://...
复制URL并将其粘贴到浏览器中(可以在任何计算机上完成)。该页面将要求您登录您的Google帐户。登录到上一步中创建开发人员项目的Google帐户 。 从API批准许可请求后,浏览器中将显示一个代码,例如“ 4 / XXXX”。将此代码复制并粘贴到终端中:
- Please go to this URL: https://...
- Enter the authorization code:
如果授权成功,您将看到类似于以下的响应。如果您看到InvalidGrantError,则输入了无效的代码。请重试,请小心复制并粘贴整个代码。
- credentials saved: /path/to/.config/google-oauthlib-tool/credentials.json
运行如下命令测试 my-dev-project为创建的Actions Console项目的Google Cloud Platform项目ID。要在Actions Console中找到项目ID 、 my-model为在上一步中注册设备模型的名称。
- googlesamples-assistant-pushtotalk --project-id my-dev-project --device-model-id my-model
按Enter键,然后尝试以下一些查询 Who am I? What time is it? 正常情况Google Assitant 会回应。
7.设置开机启动
安装PM2
- sudo npm install -g pm2
设置PM2开机启动
- pm2 startup
运行此命令后会显示一个类似如下的命令,复制此命令到终端运行。
- [PM2] To setup the Startup Script, copy/paste the following command:
- sudo env PATH=$PATH:/usr/bin /usr/lib/node_modules/pm2/bin/pm2 startup systemd -u pi --hp /home/pi
使用PM2启动MagicMirror
- cd MagicMirror/modules/MMM-VoiceAssistant/pi
- pm2 start mm.sh
使用PM2启动snowboy 语音助手程序
- cd MagicMirror/modules/MMM-VoiceAssistant/pi
- pm2 start snowboy.sh
设置开机启动PM2脚本
- pm2 save
可以运行下面语句关闭对应的脚本服务。注意,需要使用Pi用户,不能使用管理员用户。
- pm2 stop mm
- pm2 stop snowboy
8.设置屏幕常亮
打开 lightdm.conf
- sudo vi /etc/lightdm/lightdm.conf
修改 lightdm.conf 找到[SeatDefaults]段下的’xserver-command’,取消注释,修改为如下:
- #xserver-command=X
修改为
- xserver-command=X -s 0 -dpms
- -s # –设置屏幕保护不启用
- dpms 关闭电源节能管理
重启
- sudo reboot
注意事项
1.程序中唤醒词采用的是公有模型,理论上对所有人都有效,但是如果实际不能唤醒可以到snowboy官方注册账号训练自己的模型或者更改其他唤醒词。
- 登录snowboy:https://snowboy.kitt.ai 网站,找到需要设置的唤醒词,或者添加新的唤醒词。
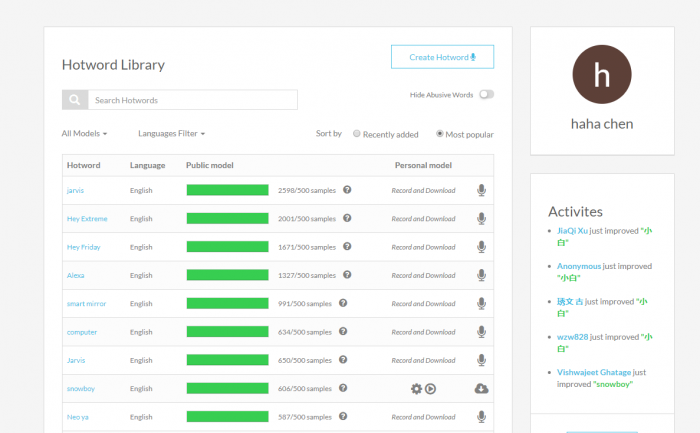
- 点击录音和下载图标录音声音,录制三次然后最后检测声音模型是否可用。
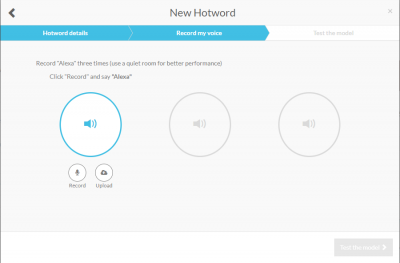
- 下载生成的私有模型,.pmdl后缀的文件,例如Alexa.pmdl.
- 将文件复制到~/MagicMirror/modules/MMM-VoiceAssistant/pi目录下.注意文件名要用英文,如果不是英文则修改文件名。
- 打开启动脚本文件修改。
- vi snowboy.sh
- 替换脚本中的文件名,其中第一个smart_mirror.umdl为中文唤醒,第二个snowboy.umdl为引文唤醒词。
- cd ~/MagicMirror/modules/MMM-VoiceAssistant/pi
- ~/env/bin/python3 demo.py smart_mirror.umdl snowboy.umdl
2.国内用户不能显示新闻,一直显示loading
系统默认英文显示,国内需要科学上网才能显示,更改配置显示中文即可以显示。
- cd ~/MagicMirror/modules/MMM-VoiceAssistant/config
- cp config.js.cn ~/MagicMirror/config/config.js #显示中文
- #cp config.js.en ~/MagicMirror/config/config.js #显示英文
- sudo reboot #重启
3.科大讯飞服务每天只有500次申请次数,超过将不再响应。用户可以将申请账户,修改程序ID和KEY
程序中用到语音合成tts和aiui两种服务。打开~/MagicMirror/modules/MMM-VoiceAssistant/pi/aiui.py。可以看到如下程序
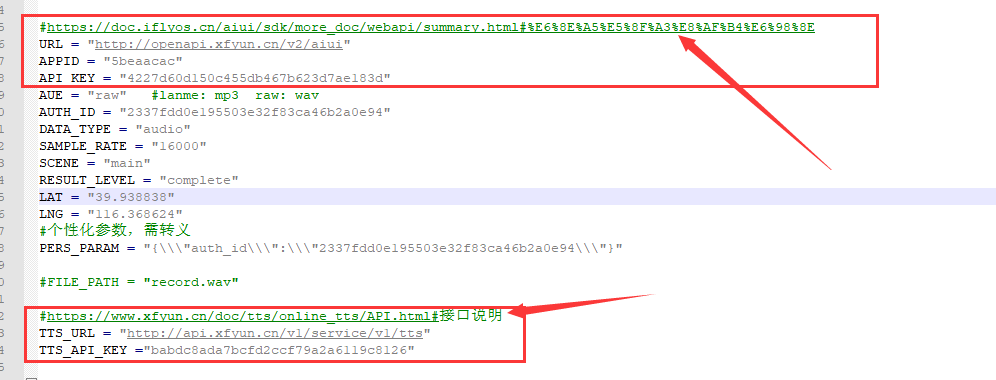
修改对应的值替换账户,注释中有文档中心连接。
4.Google Assistant Service每天只有500次申请次数,超过将不再响应。用户可以将申请账户,修改程序ID
打开~/MagicMirror/modules/MMM-VoiceAssistant/pi/audiofileinput.py。可以如下代码

按照前面 6.Google Assistant Service 安装部分操作,注册账户,设备模型,安装授权。
最后将程序中的 DEVICE_ID,DEVICE_MODEL_ID替换为对应的值
按键介绍
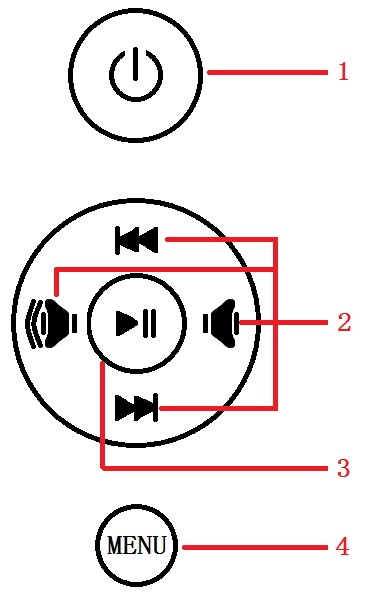
- 1:打开或关闭LCD显示,如长时间不使用LCD,可通过该按键关闭LCD显示,以降低功耗。
- 2:方向键
- 3:确定功能
- 4:打开菜单和返回功能


