

4inch HDMI LCD (C) Use the tutorial
Introduction
Features
- 4-inch IPS screen, hardware resolution is 720×720
- 5-point capacitive touch, tempered glass panel, hardness up to 6H
- When used with Raspberry Pi, supports Raspberry Pi OS / Ubuntu / Kali and Retropie
- Ubuntu is supported when used with Jetson Nano
- When used as a computer monitor, supports Windows 11/10/8.1/8/7
- Onboard dual touch circuit, optional USB Type-C or I2C touch, more application scenarios
- With 3.5mm audio and speaker interface, support HDMI audio output
Featured Design

Use with Raspberry Pi
Hardware Connection
1. Set the touch interface selector switch on the back of the screen to "I2C".
2. Fix the Raspberry Pi to the screen through the copper posts, and pay attention to align the position of the ejector pins.
3. Connect the HDMI port of Raspberry Pi to the LCD by HDMI connector
Note: Raspberry Pi Zero / Zero 2 W needs an additional HDMI cable for connection.
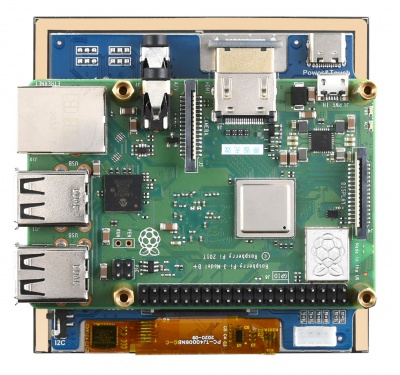
The hardware connection is as shown below (Pi 4 and Pi 3B+):
Software Connection
Raspberry Pi OS / Ubuntu / Kali and Retropie systems for Raspberry Pi.
Please download the latest version of the image from the Raspberry Pi official website
When the LCD works on systems such as Raspberry Pi, the resolution must be manually set, otherwise it will cause abnormal display. When the LCD works on the PC version of Windows system, there is no such problem.
1.Please download the latest version of the image from the Raspberry Pi official website. Download the compressed file to your PC, and extract the .img file.
2.Connect the TF card to the PC and use SDFormattersoftware to format the TF card.
3.Open the Win32DiskImager software, select the system image prepared in step 1, and click write to burn the system image.
4.After the programming is completed, open the config.txt file in the root directory of the TF card, and add the following code at the end of config.txt
dtparam=i2c_arm=on
dtoverlay=waveshare-4dpic-3b
dtoverlay=waveshare-4dpic-4b
hdmi_force_hotplug=1
config_hdmi_boost=10
hdmi_group=2
hdmi_mode=87
hdmi_timings=720 0 100 20 100 720 0 20 8 20 0 0 0 60 0 48000000 6
start_x=0
gpu_mem=128
5.Download the 4inch HDMI LCD (C) DTBO file and extract 2 dtbo files. Copy the 2 files to the overlays directory (/boot/overlays/)
6.Save, eject the TF card safely, and insert the TF card into the Raspberry Pi.
7.Power on the Raspberry Pi and wait for more than ten seconds to display normally.
Use with PC
The LCD can work on PC version Windows 11 /10 / 8.1 / 8 / 7 system.
Instructions:
1) Switch the touch interface selector switch to "USB".
2) Connect the Power&Touch interface of the LCD to the USB interface of the PC.
3) Connect the Display port of the LCD to the HDMI port of the PC.
Use with Jetson Nano
1) Switch the touch interface selector switch to "USB".
2) Connect the Power&Touch interface of the LCD to the USB interface of the Jetson Nano.
3) Connect the Display port of the LCD to the HDMI port of the Jetson Nano.


.jpg)