T-PicoC3教程
注意
在TYPE-C中,可以通过正反访问确定当前连接是PICO还是ESP32C3。
连接时,板载led灯会根据连接的芯片进行指示(由于线缆问题,有可能指示灯与实际连接的芯片相反,甚至是两个LED同时亮起,请在两个LED同时亮起时更换另一根线缆),主要判断是串口名称中显示的是当前连接的设备。
RP2040
Arduino
- Open up the Arduino IDE and go to File->Preferences.
- Unofficial libraries are used in the Arduino examples.In the dialog that pops up, enter the following URL in the "Additional Boards Manager URLs" field:
https://github.com/earlephilhower/arduino-pico/releases/download/global/package_rp2040_index.json
- Go to Tools->Boards->Board Manager in the IDE
- Type "pico" in the search box and select "Add":
- Copy TFT_eSPI to the <C:\Users\Your User Name\Documents\Arduino\libraries> directory
- Open Arduino IDE, find TFT_eSPI in the file and example, the T-Display factory test program is located at TFT_eSPI -> FactoryTest, you can also use other sample programs provided by TFT_eSPI
- In the Arduino IDE tool options, select the development board Raspberry Pi Pico, Other keep the default
- Hold down the BOOT button, click the reset button, and release the BOOT button after a delay of one second or after waiting for the computer to eject a new disk
- Finally, click upload or drag the firmware to the new disk
MicroPython
- install Thonny Python IDE
- After the installation is complete, you need to click on the toolbar, click Run -> Select Interpreter, enter the following interface, select Raspberry Pi Pico, you need to configure Pico before configuring the following ports
- Press the BOOT button, click RES, then go back to Thonny Python IDE and change the port to the serial port where Pico is located. If you don't find it, click Install or update firmware.
- Enter or save as a script to run
from machine import Pin, Timer
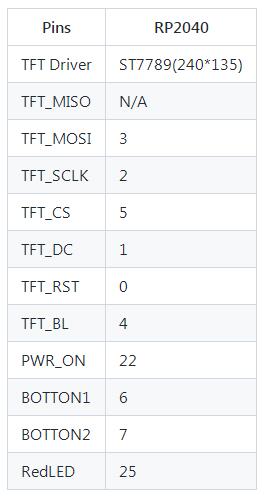
led = Pin(25,Pin.OUT)
tim = Timer()
def tick(timer):
    global led
    led.toggle()
tim.init(freq=2.5, mode=Timer.PERIODIC, callback=tick)
- If you need to save to the chip, you need to click File->Save As->rp2040.
- For more usage methods, please refer to the Micro python documentation.
ESP32-C3
Arduino
- Open up the Arduino IDE and go to File->Preferences.
- In the dialog that pops up, enter the following URL in the "Additional Boards Manager URLs" field:
- Stable release link:
https://raw.githubusercontent.com/espressif/arduino-esp32/gh-pages/package_esp32_index.json
- Development release link:
https://raw.githubusercontent.com/espressif/arduino-esp32/gh-pages/package_esp32_dev_index.json
- Go to Tools->Boards->Board Manager in the IDE
- Type "ESP32C3 Dev" in the search box and select "Add":
- Click any "file-> example-> all esp32 esamle" and upload the run
ESP32-C3 Upload method
- ESP32C3 mainly uses ESP32-AT firmware here. If you want to use it as a coprocessor, you can modify the firmware.
Method 1: if the serial port is displayed with the word jatg when connecting to USB, you can upload it directly using USB. (please note that do not use USB pins to define other functions, otherwise it will be troublesome to upload next time).Method 2: (if there is no serial port when connecting ESP32C3 USB) disconnect USB, short connect ESP32C3-IO9 and GND, and then reconnect USB (note that ESP32C3 device is selected to connect USB).


