- 首页
- >
- 文章中心
- >
- 树莓派教程
- >
- 树莓派主板
- >
- 树莓派ZERO/3B/4B
树莓派系列教程15:红外遥控
上一章我们介绍了如果通过树莓派device tree,将在ds18b20添加到linux系统中,并通过命令行读取温度数据,这一章我们也通过device tree添加红外接收
lirc为linux系统中红外遥控的软件,树莓派系统已经有这个模块,我们只需设置一下就而已使用。
1 | sudo vi /boot/config.txt |
在文件后面添加下面这一行
1 | dtoverlay=lirc-rpi,gpio_in_pin=18 |
红外默认输出是18管脚,如果红外接收头接到其他管脚则需修改对应管脚,(管脚为BCM编码),Pioneer 600接收头默认接到18管脚故只需要添加
1 | dtoverlay=lirc-rpi |
在/boot/overlay/README文件中我们可以找到详细说明。
安装lirc软件
1 | sudo apt-get install lirc |
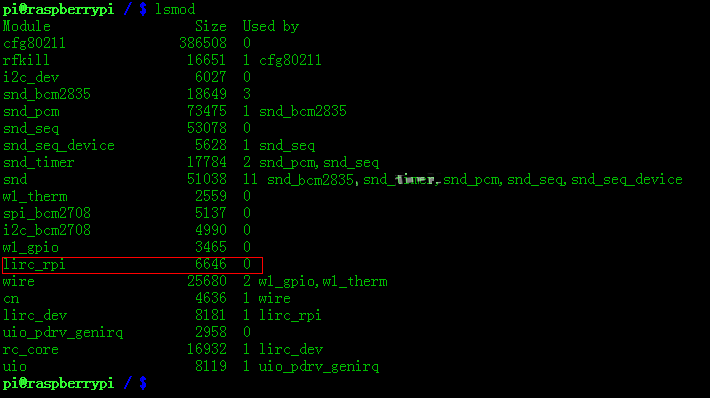
运行lsmod命令查看设备是否已启动,如若没有找到可运行sudo modprobe lirc_rpi加载驱动。
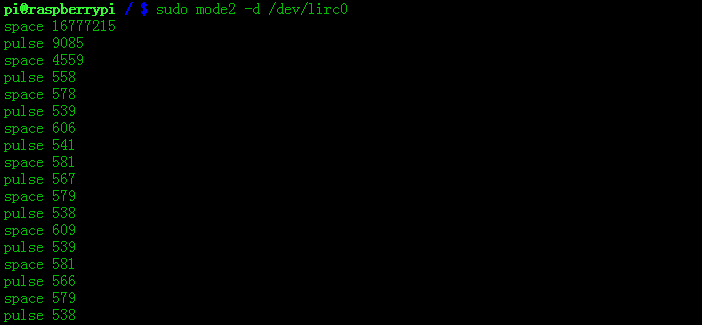
运行sudo mode2 –d /dev/lirc0,按遥控上任何键,查看是否接到到类似脉冲。
如有接到到脉冲测lirc正常使用。
采用脉宽调制的串行码,以脉宽为0.565ms、间隔0.56ms、周期为1.125ms的组合表示二进制的"0";以脉宽为0.565ms、间隔1.685ms、周期为2.25ms的组合表示二进制的"1
协议:
上述“0”和“1”组成的32位二进制码经38kHz的载频进行二次调制以提高发射效率,达到降低电源功耗的目的。然后再通过红外发射二极管产生红外线向空间发射,如下图。
| 引导码 | 用户识别码 |用户识别码反码 | 操作码 | 操作码反码 |
一个命令只发送一次,即使遥控器上的按键一直按着。但是会每110mS发送一次代码,直到遥控器按键释放。
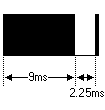
重复码比较简单:一个9mS的AGC脉冲、2.25mS间隔、560uS脉冲。
bcm2835程序:
cpp代码:
01 | #include <bcm2835.h> |
02 | #include <stdio.h> |
03 | #define PIN 18 |
04 | #define IO bcm2835_gpio_lev(PIN) |
05 | unsigned char i,idx,cnt; |
06 | unsigned char count; |
07 | unsigned char data[4]; |
08 |
09 | int main(int argc, char **argv) |
10 | { |
11 | if (!bcm2835_init())return 1; |
12 | bcm2835_gpio_fsel(PIN, BCM2835_GPIO_FSEL_INPT); |
13 | bcm2835_gpio_set_pud(PIN, BCM2835_GPIO_PUD_UP); |
14 | printf("IRM Test Program ... \n"); |
15 |
16 | while (1) |
17 | { |
18 | if(IO == 0) |
19 | { |
20 | count = 0; |
21 | while(IO == 0 && count++ < 200) //9ms |
22 | delayMicroseconds(60); |
23 | |
24 | count = 0; |
25 | while(IO == 1 && count++ < 80) //4.5ms |
26 | delayMicroseconds(60); |
27 | |
28 | idx = 0; |
29 | cnt = 0; |
30 | data[0]=0; |
31 | data[1]=0; |
32 | data[2]=0; |
33 | data[3]=0; |
34 | for(i =0;i<32;i++) |
35 | { |
36 | count = 0; |
37 | while(IO == 0 && count++ < 15) //0.56ms |
38 | delayMicroseconds(60); |
39 | |
40 | count = 0; |
41 | while(IO == 1 && count++ < 40) //0: 0.56ms; 1: 1.69ms |
42 | delayMicroseconds(60); |
43 |
44 | if (count > 25)data[idx] |= (1<1<cnt); |
45 | if(cnt== 7) |
46 | { |
47 | cnt=0; |
48 | idx++; |
49 | } |
50 | else cnt++; |
51 | if(data[0]+data[1] == 0xFF && data[2]+data[3]==0xFF) //check |
52 | printf("Get the key: 0x%02x\n",data[2]); |
53 | } |
54 | } |
55 | bcm2835_close(); |
56 | return 0; |
57 |
58 | } |
编译并执行,按下遥控按键,终端会显示接到到按键的键值。
01#!/usr/bin/python
02# -*- coding:utf-8 -*-
03import RPi.GPIO as GPIO
04import time
05
06PIN = 18;
07
08GPIO.setmode(GPIO.BCM)
09GPIO.setup(PIN,GPIO.IN,GPIO.PUD_UP)
10print('IRM Test Start ...')
11try:
12 while True:
13 if GPIO.input(PIN) == 0:
14 count = 0
15 while GPIO.input(PIN) == 0 and count < 200: #9ms
16 count += 1
17 time.sleep(0.00006)
18
19 count = 0
20 while GPIO.input(PIN) == 1 and count < 80: #4.5ms
21 count += 1
22 time.sleep(0.00006)
23
24 idx = 0
25 cnt = 0
26 data = [0,0,0,0]
27 for i in range(0,32):
28 count = 0
29 while GPIO.input(PIN) == 0 and count < 15: #0.56ms
30 count += 1
31 time.sleep(0.00006)
32
33 count = 0
34 while GPIO.input(PIN) == 1 and count < 40: #0: 0.56mx
35 count += 1 #1: 1.69ms
36 time.sleep(0.00006)
37
38 if count > 8:
39 data[idx] |= 1>>cnt
40 if cnt == 7:
41 cnt = 0
42 idx += 1
43 else:
44 cnt += 1
45 if data[0]+data[1] == 0xFF and data[2]+data[3] == 0xFF: #check
46 print("Get the key: 0x%02x" %data[2])
47except KeyboardInterrupt:
48GPIO.cleanup();
01 | #!/usr/bin/python |
02 | # -*- coding:utf-8 -*- |
03 | import RPi.GPIO as GPIO |
04 | import time |
05 |
06 | PIN = 18; |
07 |
08 | GPIO.setmode(GPIO.BCM) |
09 | GPIO.setup(PIN,GPIO.IN,GPIO.PUD_UP) |
10 | print('IRM Test Start ...') |
11 | try: |
12 | while True: |
13 | if GPIO.input(PIN) == 0: |
14 | count = 0 |
15 | while GPIO.input(PIN) == 0 and count < 200: #9ms |
16 | count += 1 |
17 | time.sleep(0.00006) |
18 |
19 | count = 0 |
20 | while GPIO.input(PIN) == 1 and count < 80: #4.5ms |
21 | count += 1 |
22 | time.sleep(0.00006) |
23 |
24 | idx = 0 |
25 | cnt = 0 |
26 | data = [0,0,0,0] |
27 | for i in range(0,32): |
28 | count = 0 |
29 | while GPIO.input(PIN) == 0 and count < 15: #0.56ms |
30 | count += 1 |
31 | time.sleep(0.00006) |
32 | |
33 | count = 0 |
34 | while GPIO.input(PIN) == 1 and count < 40: #0: 0.56mx |
35 | count += 1 #1: 1.69ms |
36 | time.sleep(0.00006) |
37 |
38 | if count > 8: |
39 | data[idx] |= 1>>cnt |
40 | if cnt == 7: |
41 | cnt = 0 |
42 | idx += 1 |
43 | else: |
44 | cnt += 1 |
45 | if data[0]+data[1] == 0xFF and data[2]+data[3] == 0xFF: #check |
46 | print("Get the key: 0x%02x" %data[2]) |
47 | except KeyboardInterrupt: |
48 | GPIO.cleanup(); |
执行,按下遥控按键,终端会显示接到到按键的键值。
1sudo python irm.py
1 | sudo python irm.py |


